Visão geral de cogumelos e tendência global
* Algumas das seções deste artigo são muito longas. Use o índice no topo do artigo para pular para a seção de seu interesse.
O cultivo / cultivo de cogumelos começou como um hobby, no entanto, é um completo, profissão altamente lucrativa / agronegócio . A maioria das variedades de cogumelos pode ser cultivada / cultivada em quartos, galpões, garagens, caves e pequenos armazéns.
A agricultura comercial de cogumelos foi introduzida na Índia no final dos anos 1960, quando um agricultor alemão colaborou com um agricultor indiano em Solan, uma cidade no estado indiano de Himachal Pradesh, sob um esquema denominado “Desenvolvimento do cultivo de cogumelos em Himachal Pradesh”.
Este artigo se concentrará em fornecer informações sobre os tipos de cogumelos, mercado global e local de cogumelos, produção global e local de cogumelos, juntamente com participação na produção, técnicas de cultivo de cogumelos na Índia, algumas das doenças associadas a cogumelos cultivados / cultivados e variedades de cogumelos que podem ser cultivados localmente para fins comerciais. Por favor, consulte o tabela de conteúdo seção para ir direto ao tópico de seu interesse.
Os empresários adotaram a cultura de cogumelos em grande estilo. A mensagem chegou às pessoas que os cogumelos têm um mercado nacional e internacional.R N Verma, Diretor do Centro Nacional de Pesquisa e Treinamento de Cogumelos -NCMRT
Consumo mundial de cogumelos em comparação com a Índia
O consumo de cogumelos na Índia é muito baixo em comparação com muitos países consumidores de cogumelos.

Desde a, a tendência de consumo de cogumelos tem visto uma taxa de crescimento muito lenta na Índia, o cultivo de cogumelos não acompanhou a tendência global.
Atualmente, o consumo de cogumelos na Índia é estimado em cerca de 30-40 g, em comparação com 2-3 kg nos Estados Unidos e na Europa. A Índia consome cerca de 90 gramas de cogumelos por pessoa, uma quantidade relativamente baixa em comparação com outros países, incluindo os EUA com 1,49 quilogramas e a China com 1,16 quilogramas.
Produção global de cogumelos e participação no mercado
O mercado de cogumelos teve um valor global de $ 35 bilhões em 2015. No período entre 2016 e 2021, o mercado está projetado para crescer 9,2 por cento. Como resultado, em 2021, o mercado deve chegar a quase US $ 60 bilhões. Os principais produtores de cogumelos incluem a China, os Estados Unidos, Os Países Baixos, Polônia, Espanha, França, Itália, Irlanda, Canadá e Reino Unido.
| País | 2010 | 2011 | 2012 | 2013 | 2014 | 2015 | 2016 |
| China | 48, 26, 000 | 56, 58, 972 | 65, 27, 965 | 70, 68, 102 | 75, 91, 140 | 80, 26, 152 | 77, 86, 368 |
| Itália | 6, 84, 401 | 7, 61, 858 | 10, 16, 886 | 6, 04, 525 | 6, 00, 114 | 5, 94, 835 | 6, 83, 620 |
| EUA | 3, 59, 469 | 3, 90, 902 | 4, 02, 904 | 4, 08, 157 | 4, 32, 100 | 4, 29, 562 | 4, 19, 630 |
| Holanda | 2, 66, 000 | 3, 04, 000 | 3, 07, 000 | 3, 23, 000 | 3, 10, 000 | 3, 10, 000 | 3, 00, 000 |
| Polônia | 2, 30, 000 | 2, 20, 000 | 2, 28, 300 | 2, 37, 069 | 2, 45, 747 | 2, 52, 944 | 2, 60, 140 |
| Espanha | 1, 33, 000 | 1, 46, 100 | 1, 47, 440 | 1, 49, 700 | 1, 49, 854 | 2, 18, 795 | 1, 97, 010 |
| Canadá | 78, 452 | 84, 202 | 1, 37, 597 | 1, 32, 448 | 1, 34, 545 | 1, 18, 642 | 1, 33, 935 |
| França | 1, 19, 373 | 1, 15, 696 | 1, 16, 602 | 1, 04, 461 | 1, 08, 671 | 1, 01, 135 | 1, 01, 949 |
| Reino Unido | 69, 300 | 70, 740 | 78, 580 | 85, 484 | 94, 857 | 1, 03, 197 | 99, 813 |
| Irlanda | 54, 500 | 57, 700 | 69, 600 | 67, 700 | 69, 600 | 72, 200 | 70, 000 |
| Índia | 40, 600 | 40, 600 | 30, 000 | 17, 000 | 28, 000 | 33, 699 | 29, 992 |
| República da Coreia | 26, 250 | 24, 787 | 26, 000 | 26, 771 | 26, 860 | 26, 292 | 26, 158 |
| Todos os outros | 53, 69, 166 | 62, 27, 659 | 70, 94, 714 | 76, 65, 730 | 82, 16, 306 | 86, 59, 997 | 84, 80, 171 |
| Produção total | 1, 22, 56, 511 | 1, 41, 03, 216 | 1, 61, 83, 588 | 1, 68, 90, 147 | 1, 80, 07, 794 | 1, 89, 47, 450 | 1, 85, 88, 786 |
Entre os principais produtos de cogumelos estão o shiitake, botão, ostra, e outros produtos que contenham cogumelo em casca, cogumelo leitoso, cogumelo reishi, e cogumelos de inverno, Espécies de Morchella e Tuber magatum.

Apesar de, os países asiáticos deverão crescer mais em termos de produção de cogumelos, A Índia ainda está crescendo no negócio de cultivo de cogumelos a uma taxa bastante lenta de 4,3% ao ano.
Há 105,4 toneladas de cogumelos brancos sendo exportados pela Índia em conserva e congelada. Entre a produção mundial de cogumelos, A produção de cogumelos botão da Índia contribui com 15%.
Um total de aproximadamente 0,13 milhão de toneladas de cogumelos foi produzido pelo cultivo de cogumelos na Índia entre 2010 e 2017. Mesmo assim, este número parece grande, mas parece insignificante quando comparado a outros países produtores de cogumelos.
Uma vez que o custo do cultivo de cogumelos está alto no oeste, esta é uma oportunidade perfeita para os fazendeiros e empreendedores indianos começarem a pensar seriamente sobre o cultivo de cogumelos na Índia.
O custo de produção de cogumelos no Ocidente está aumentando devido aos altos custos da mão de obra. Europeus e americanos estão cada vez mais olhando para a China e a Índia para seus cogumelos. L Dhar, Cientista sênior (NCMRT)
Cultivo de cogumelos na Índia:produção e tendência
Agaricus bisporus (cogumelo de botão branco), Pleurotus spp. (cogumelo ostra), Volvariella volvacea (cogumelo de arroz), e Calocybe indica - o cogumelo leitoso compreende as principais variedades de cogumelos cultivadas na Índia.
Pleurotus sajor-caju, Pleurotus flordia, Pleurotus flabellatus, Pleurotus eous, e Pleurotus florida são as espécies de Pleurotus mais amplamente cultivadas.
Em regiões tropicais e subtropicais, ostras, palha de arroz, e cogumelos leitosos são cultivados sazonalmente.
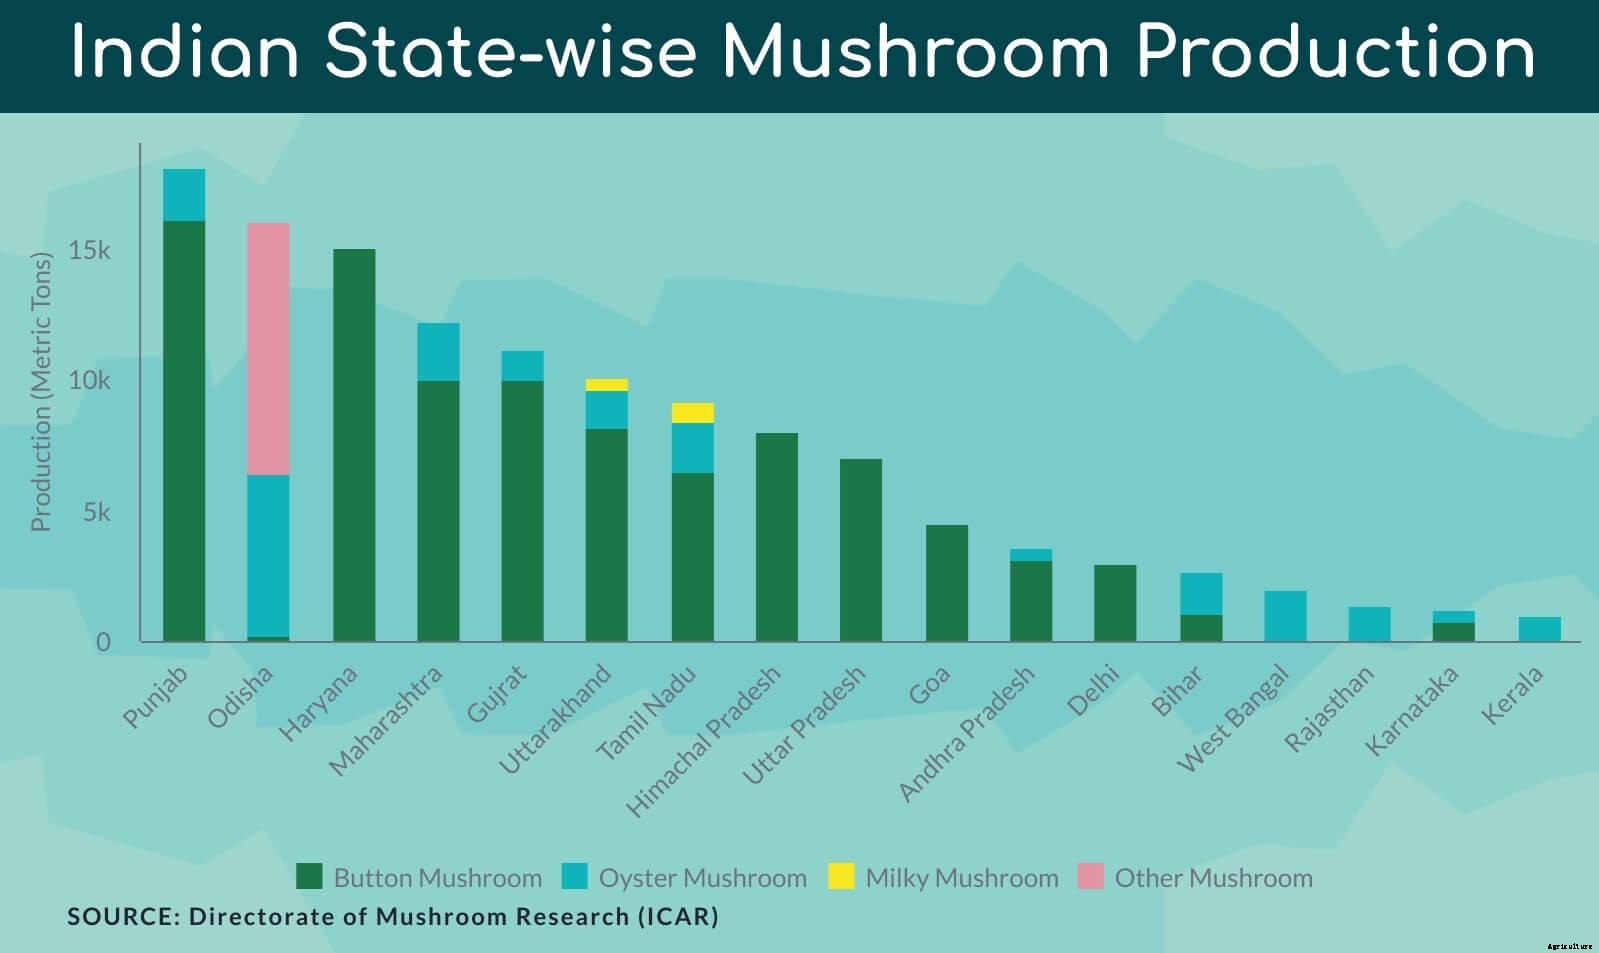
Existem aproximadamente 73% dos cogumelos botão produzidos na Índia e os sistemas de produção são agrícolas sazonais e também de alta tecnologia.
A produção de cogumelos ostra é responsável por 16% da produção total de cogumelos e 10, 000 toneladas anuais são produzidas na Índia. Orissa, Karnataka, Maharashtra, Andhra Pradesh, Madhya Pradesh, Bengala Ocidental, assim como Meghalaya, Tripura, Manipur, Mizoram, e Assam cultivam cogumelos ostra em grandes quantidades.
O primeiro cogumelo indígena a ser comercializado na Índia é o Calocybe indiaca (cogumelo leitoso).
Tradicionalmente, o cogumelo Shiitake foi cultivado na Índia em toras de madeira, mídia artificial, espigas de milho, serragem, farelo de trigo, e outros aditivos. O cultivo do cogumelo Shiitake é insignificante e mal sucedido na Índia devido aos métodos de cultivo não padronizados.
Teor de nutrientes dos cogumelos
Os cogumelos são uma excelente fonte de proteínas e fibras solúveis, que desempenham um papel importante na saúde humana.
Como uma proteína relativamente fácil de digerir (70-90%), a proteína do cogumelo é considerada superior à proteína vegetal.
A tabela a seguir mostra o conteúdo de nutrientes por 100 gramas de cogumelo.
| ESPÉCIES DE COGUMELO | PROTEÍNA | GORDURA | CARBOHYDRATE | FIBRA | CINZA | ENERGY KCAL |
| Auricularia Auricula | 4,20 | 8,30 | 82,80 | 19,80 | 4,70 | 351,00 |
| Agaricus Bisporus | 33,48 | 3,10 | 46,17 | 20,90 | 5,70 | 499,00 |
| Calocybe Indica | 17,69 | 4,10 | 64,26 | 3,40 | 7,43 | 391,00 |
| Flammulina Velutipes | 17,60 | 1,90 | 73,10 | 3,70 | 7,40 | 378,00 |
| Lentinula Edodes | 32,93 | 3,73 | 47,60 | 28,80 | 5,20 | 387,00 |
| Pleurotus Sajor-caju | 19,23 | 2,70 | 63,40 | 48,60 | 6,32 | 412,00 |
| Pleurotus Ostreatus | 30,40 | 2,20 | 57,60 | 8,70 | 9,80 | 265,00 |
| Volvariella Volvacea | 37,50 | 2,60 | 54,80 | 5,50 | 1,10 | 305,00 |
Na Índia, existem vários cogumelos medicinais, incluindo Ganoderma lucidum, Phellinus rimosus, e Pleurotus spp., que possuem profundas propriedades medicinais.
Seis etapas do cultivo de cogumelos
A seção seguinte do artigo descreve as etapas. Essas etapas são basicamente divididas em duas fases. Essas etapas incluem o processo de cultivo, começando desde a preparação do composto para os cogumelos até o cultivo dos cogumelos.
Fase I
Etapa 1. Preparando o composto
- Principalmente, a preparação do composto é feita ao ar livre. Contudo, também pode ser feito em um recinto com galpão.
- Um cais, uma estrutura de concreto é usada para fazer o composto.
- Pilhas de material de composto podem ser misturadas manualmente ou com a ajuda de um virador de composto.
- Existem dois tipos de compostos:composto natural (o ingrediente principal é estrume de cavalo) e composto sintético (feno, espiga de milho esmagada, casca de madeira dura, cascas de sementes de algodão, cascas de grãos de cacau, Pseudo haste da banana, Resíduos de fábrica de algodão, Jacinto de água, bagaço de uva neutralizado, jornal rasgado velho, ureia, cálcio, etc.)
- Ambos os tipos de composto precisarão de suplementação adicional de nitrogênio e gesso.
- À medida que o composto é virado, é umedecido (borrifado com água) para uma mistura adequada do composto. Suplemento de nitrogênio e gesso também são adicionados nesta etapa.
- O subproduto deste processo é o calor, dióxido de carbono e amônia. A fonte de alimento mais apropriada é criada para cogumelos no composto por reações químicas de liberação de calor e microorganismos no composto.
- Quantidade adequada de umidade, oxigênio, nitrogênio e carboidratos devem estar presentes durante todo o processo ou a compostagem será interrompida.
- A adição de gesso traz muitas vantagens. O gesso ajuda os produtos químicos adicionados ao composto a flocular nas palhas ou no feno. Também reduz a oleosidade do composto. Ajuda na aeração do composto, o que, por sua vez, minimiza o risco de desenvolvimento de produtos químicos que impedirão o bom crescimento dos cogumelos no composto.
- 20kg de gesso por tonelada métrica é recomendado para ser adicionado ao composto.
- O suplemento de nitrogênio é adicionado ao composto para aumentar o conteúdo de nitrogênio do composto natural para 1,5% ou do composto sintético para 1,7%.
- Suplementos de nitrogênio, como farinhas de sementes de soja, algodão ou amendoim e esterco de galinha podem ser usados.
- Composto sintético exigirá adição de nitrato de amônio ou uréia também.
- A altura da estaca deve ser de 5 a 6 pés na laje de concreto. Uma laje elevada de concreto é aconselhável para evitar qualquer retenção de água, proporcionando uma boa drenagem. Mantenha a pilha rígida e densa dos lados, mas solta do centro para uma boa aeração.
- A temperatura ideal do composto é de 60 a 80 graus Celsius. Os intervalos entre o número de reviravoltas do composto dependem da temperatura e da condição do material do composto.
- O equilíbrio da adição de água ao composto deve ser mantido o tempo todo. Menos água resultará na interrupção da criação de alimentos para cogumelos e o excesso de água levará à interrupção da aeração. Um bom equilíbrio da atividade microbiana, Valor nutritivo, agua, e a temperatura são todas necessárias e o desequilíbrio de até mesmo um componente pode arruinar a qualidade do composto.
- A compostagem levará de uma a duas semanas, dependendo da condição do material do composto e do giro.
- O composto desejável deve ser macio, canudos flexíveis; um cheiro forte de amônia; temperatura de quase 75 graus Celsius ou superior; cor marrom chocolate; e teor de umidade de 68 a 74 por cento.
Fase II
Etapa 2. Preparando o composto
- Esta etapa é para pasteurização do composto para eliminar insetos, fungos e nemátodos de pragas. Também é necessário remover a amônia. A porcentagem de amônia deve ser inferior a 0,07.
- Existem três tipos de métodos usados para esta etapa. O composto é colocado em salas com ambiente otimizado controlado.
- Método de bandeja de madeira:o composto é embalado em bandejas de madeira e empilhadas umas sobre as outras.
- Método do sistema de camas:o composto é espalhado sobre as camas nos quartos com ambiente controlado.
- Método do sistema a granel:O composto é empilhado em caixas de blocos de cimento perfuradas.
- Organismos desammonizadores sob condições adequadas usarão carboidratos e nitrogênio e, portanto, removerão o excesso de amônia do composto.
- Geralmente, dois tipos de ambientes controlados são usados para esta etapa:
- Ambiente de baixa temperatura:A temperatura do composto é elevada para 52 graus Celsius. Depois disso, a temperatura é reduzida em aproximadamente 1 grau Celsius até que o cheiro de amônia desapareça completamente.
- Ambiente de alta temperatura:A temperatura do composto é elevada para 63 graus Celsius por cerca de 6 a 8 horas. Isso pode ser feito injetando vapor no composto. E então a temperatura é reduzida para 60 graus Celsius. Depois disso, o composto é deixado para esfriar naturalmente em uma temperatura de 1 a 2 graus todos os dias até que o conteúdo de amônia seja reduzido aos níveis desejáveis.
- A temperatura ideal do composto é de 24 a 27 graus Celsius. A umidade deve estar entre 68 a 72 por cento e o conteúdo de nitrogênio deve ser de 2 a 2,4 por cento. 2,5 a 3,2 kg de composto por pé quadrado da bandeja é aconselhável para maximizar a produção / rendimento de cogumelos.
Etapa 3. Geração / Semeadura do micélio do cogumelo
- Na natureza, cogumelos são propagados por esporos microscópicos abaixo da tampa do cogumelo. Mas esses esporos não podem ser manuseados como sementes para semear no composto.
- Portanto, Os cogumelos são plantados com micélio, um fio fino como a célula de um cogumelo.
- O micélio propagado vegetativamente é conhecido como desova.
- Tradicionalmente, as desovas eram misturadas com o composto à mão.
- No sistema de bandeja moderno, a semente é misturada ao composto à medida que as bandejas se movem pela esteira.
- No sistema de cama, a desova é misturada ao composto com máquinas de desova que possuem texturas semelhantes a dedos pequenos.
- Uma temperatura de 24 graus Celsius é mantida no ambiente controlado. O micélio da semente se combinará e produzirá uma massa branca no composto. Manter uma temperatura consistente é muito importante, pois a alta temperatura mata o micélio e a baixa temperatura diminui o crescimento do micélio.
Etapa 4:revestimento
- Um solo de cobertura é aplicado ao composto para a formação de cogumelos. Esta etapa é chamada de revestimento.
- Uma mistura de calcário e turfa, composto recuperado, esterco de vaca com solo de jardim, ou solo franco-argiloso são uma boa opção para revestir o composto.
- Quando o micélio se funde, forma uma estrutura semelhante a uma corda grossa chamada rizomorfos. Esses rizomorfos crescem e se tornam cogumelos.
- O invólucro sempre deve ser pasteurizado antes da aplicação para matar qualquer inseto ou patógeno.
- O invólucro deve ser aplicado uniformemente no composto com a profundidade adequada. Para que as crias possam penetrar e crescer além do invólucro em cogumelos saudáveis.
- O composto deve ser colocado em um ambiente controlado com boa umidade e temperatura regulada para 24 graus Celsius.
- A temperatura do composto deve ser reduzida todos os dias em aproximadamente 1 grau Celsius até o momento em que pequenos cogumelos são vistos brotando do composto.
- A aplicação de água após o revestimento é uma arte que o cultivador aprenderá depois de ganhar experiência.
Etapa 5:Fixação
- Após o revestimento, uma conseqüência dos rizomorfos pode ser vista uniformemente em toda a cama de composto. Essas conseqüências são chamadas de “iniciais”.
- Quando a "inicial" cresce para um tamanho maior (aproximadamente 4 vezes o tamanho de uma "inicial"), é chamado de “Pin”.
- Em quase 3 semanas, esses pinos crescerão e se tornarão cogumelos colhíveis.
- Certifique-se de que o nível de dióxido de carbono no ar seja de 0,08% ou menos.
- A redução do nível de dióxido de carbono é feita pela introdução de ar fresco no sistema.
- O melhor momento para introduzir ar fresco pode ser quando o micélio pode ser visto emergindo da superfície do invólucro.
- A redução precoce do dióxido de carbono pode resultar no crescimento lento do micélio. Os cogumelos podem começar a crescer abaixo da superfície do invólucro, o que resultará em cogumelos sujos.
- A etapa de fixação é muito importante, pois determina o rendimento e a qualidade dos cogumelos.
Etapa 6:recorte
- A colheita do cogumelo depende da qualidade e do estágio de crescimento do cogumelo.
- Por exemplo, em algumas partes do mundo, como a América do Norte, os clientes preferem um cogumelo com um véu bem fechado. Enquanto que, em algumas partes do mundo, como a Europa, os clientes preferem cogumelos com véus alongados maiores.
- A colheita de cogumelos é composta por ciclos de cultivo / colheita que geralmente se expandem em um ciclo de 3 a 5 dias. Esses ciclos de cultivo são conhecidos como florescimento, nivelar ou quebrar.
- Diferentes agricultores seguem diferentes padrões de cultivo, dependendo do mercado e das demandas dos clientes. Alguns agricultores podem colher cogumelos tão cedo quanto 30 dias e, por outro lado, alguns agricultores podem esticar o tempo de colheita para 150 dias.
- Dependendo da espécie de cogumelo, a colheita do cogumelo para a colheita pode ser diferente.
*Uma leitura obrigatória : 8 tipos de solos da Índia e distribuição do solo na Índia
Guia para diferentes cultivo de cogumelos na Índia
Agora que discutimos as regras gerais de cultivo de cogumelos, vamos dar uma olhada nas técnicas de cultivo e recomendações para diferentes cultivo de cogumelos na Índia.
Vamos tirar o básico e os procedimentos comuns do caminho antes de nos apresentarmos ao cultivo de diferentes cogumelos.
Primeira e segunda etapas do cultivo de cogumelos, ou seja, compostagem e acabamento da compostagem são praticamente os mesmos para todos os cogumelos, como botão, leitoso, palha de arroz, ostra, Reishi e Shiitake.
Conforme discutido anteriormente neste artigo (em seis etapas para cultivo de cogumelos), existem dois tipos de compostos:Composto sintético e Composto natural.
Composto sintético para cultivo de cogumelos
- Como o nome sugere, ele obtém os nutrientes de componentes feitos sinteticamente, como a uréia, gesso e nitrato de cálcio e amônio ou sulfato de amônio.
- A palha é cortada no comprimento de 8 a 20 cm e espalhada uniformemente sobre um leito de composição e regada uniformemente com água.
- Vamos assumir o tamanho da bandeja de 1 metro x 0,5 metro x 0,15 metro para o cultivo de cogumelos. Também, vamos supor que usaremos 15 dessas bandejas para cultivo de cogumelos. Ingredientes necessários:
| INGREDIENTES NECESSÁRIOS | QUANTIDADE REQUERIDA |
| Palha de trigo | 250 kg |
| Uréia | 3 kg |
| Gesso | 20 kg |
| Arroz / Farelo de Trigo | 20 kg |
| Sulfato de Amônio / Nitrato de Cálcio Amônio | 3 kg |
*Uma leitura obrigatória : Guia completo para tipos de fertilizantes:sua classificação e uso
- Uma pilha é feita misturando todos os ingredientes, exceto o gesso.
- A altura da pilha pode variar de 1 metro a 2 metros. Vamos supor uma altura de pilha de 1 metro com largura de 1 metro.
- A pilha deve ter um exterior firme e denso, mas um meio macio para que a aeração possa ocorrer de forma adequada.
- Como mencionado anteriormente, o processo de abrir e misturar o composto novamente é chamado de “viragem”. O número de voltas depende da condição dos ingredientes e do clima. Agricultores diferentes têm regimes diferentes para virar.
- A ativação pode ser feita em:
| DIA | GESTÃO DE GESTÃO |
| 1º dia | Virando sem suplementação para o composto |
| 4º dia | Virando sem suplementação para o composto |
| 8º dia | Virando sem suplementação para o composto |
| 12º dia | Virando junto com a adição de 10 Kg de Gesso |
| 16º dia | Virando junto com a adição de mais 10 Kg de Gesso |
| 20º dia | Virando e também adicionando 10 ml de (Malathion, PONTO, Lindano, BHC) em 5 litros de água |
- O esterco de galinha tem maiores teores de nutrientes, como nitrogênio (4,55 a 5,46%), fósforo (2,46 a 2,82%), potássio (2,02 a 2,32%), cálcio (4,52 a 8,15%), magnésio (0,52 a 0,73%). Você também pode adicionar 60 kg de estrume de galinha ao composto, se possível.
Composto natural para cultivo de cogumelos
- Como o nome sugere, este composto é feito com ingredientes naturais.
- Novamente, vamos assumir o tamanho da bandeja de 1 metro x 0,5 metro x 0,15 metro para o cultivo de cogumelos. Também, vamos supor que usaremos 15 dessas bandejas para cultivo de cogumelos. Ingredientes necessários:
| INGREDIENTES NECESSÁRIOS | QUANTIDADE REQUERIDA |
| Estrume de Aves | 100 kg |
| Palha de trigo | 350 kg |
| Estrume de cavalo | 1000 kg |
| Gesso | 25 kg |
- Os ingredientes são misturados e umedecidos com água no pátio de compostagem.
- Uma pilha de composto é feita e observada até que comece a emitir odor de amônia.
- A pilha de composto é revolvida a cada 4 dias e em 3
rd
e 4
º
transformando 25 kg de gesso é adicionado por tonelada de composto.
- Na última vez, você pode adicionar 10 ml de Malathion, PONTO, Lindano ou BHC em 5 litros de água para o composto.
* Uma leitura obrigatória : Guia completo para tipos de fertilizantes:sua classificação e uso
Condições climáticas para cultivo de cogumelos na Índia
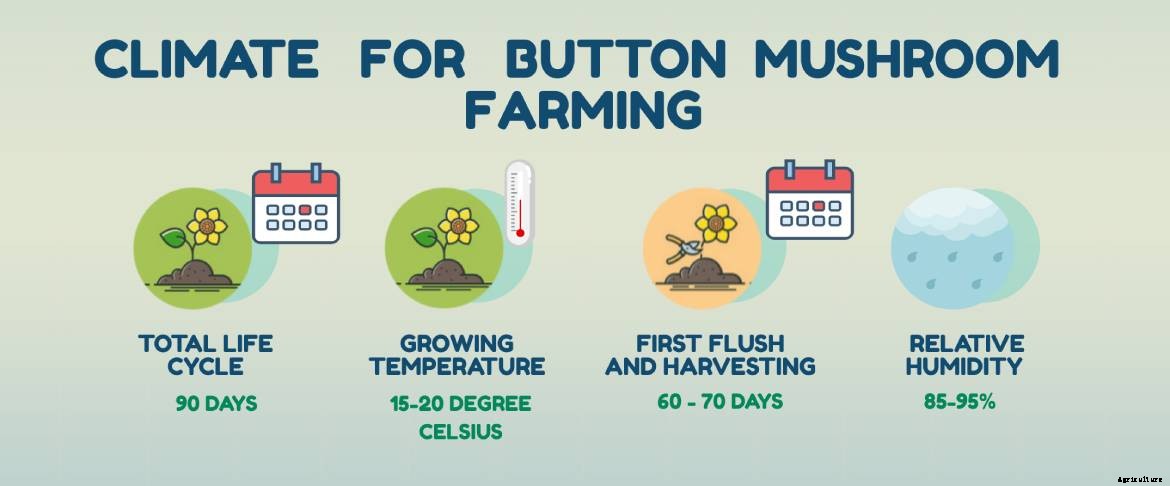
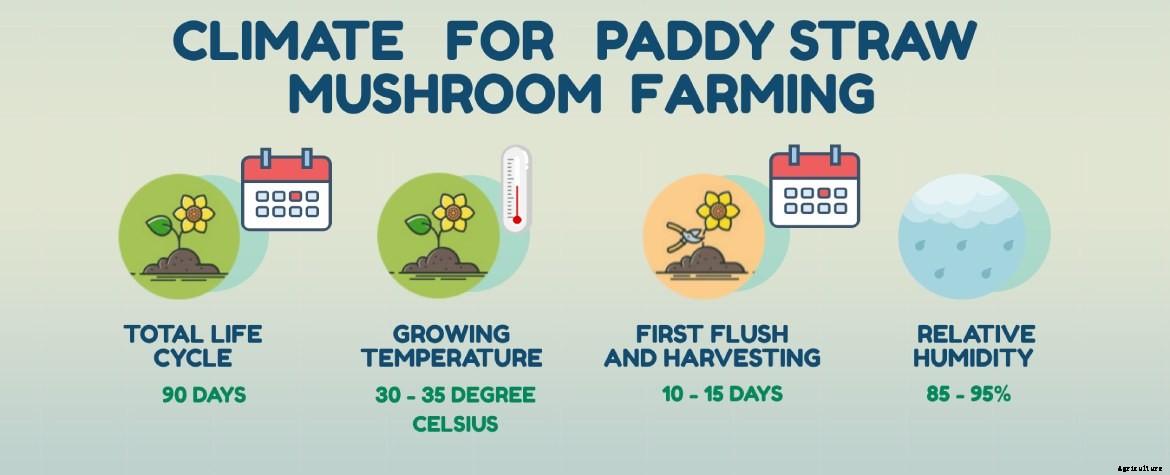
A tabela a seguir lista as condições climáticas, condições de armazenamento, detalhes da primeira descarga, rendimento e custo aproximado do cogumelo botão, cogumelo ostra, pady straw muashroom e cultivo de cogumelos lácteos na Índia.
| CHARECTERESTICS | BUTTON MUSHROOM | OYSTER MUSHROOM | PADDY STRAW MUSHROOM | MILKY MUSHROOM |
| ESPÉCIES | Agaricus Spp | Pleurotus Spp | Volveriella Spp | Calocybe Indica |
| SUBSTRATE | Composto | Paddy Straw | Paddy Straw | Paddy Straw |
| GROWING TEMPERATURE | 15-20°C | 20-25°C | 30-35°C | 30-35°C |
| RLATIVE HUMIDITY | 85-95% | 85% | 85-95% | 85% |
| TOTAL LIFE CYCLE | 90 Days | 35-45 Days | 90 Days | 45 - 50 Days |
| FIRST FLUSH AND HARVEST | 60 -70 Days | 15 - 25 Days | 10 - 15 Days | 24 - 28 Days |
| YEILD | 800-900 grams / Bed (4 Kilo Grams Compost) | 635 grams (500 grams Paddy Straw) | 800-900 grams / Bed (4 Kilo Grams Compost) | 700 grams (500 grams Paddy Straw) |
| SHELF LIFE (ROOM TEMP.) | 2 Days | 2 Days | 1 Day | 3 Days |
| SHELF LIFE (REFRIGERATED) | 3 Days | 3 Days | 2 Days | 5 - 7 Days |
| PROTEIN | 23.90% | 23.60% | 23.90% | 32% |
| PRODUCTION COST | 120* INR | 80* INR | 60* INR | 70* INR |
*The prices mentioned in the table might vary from state to state.
After phase I and phase II of compost making and pasteurization of compost, we can start with spawning and cultivating the mushrooms.
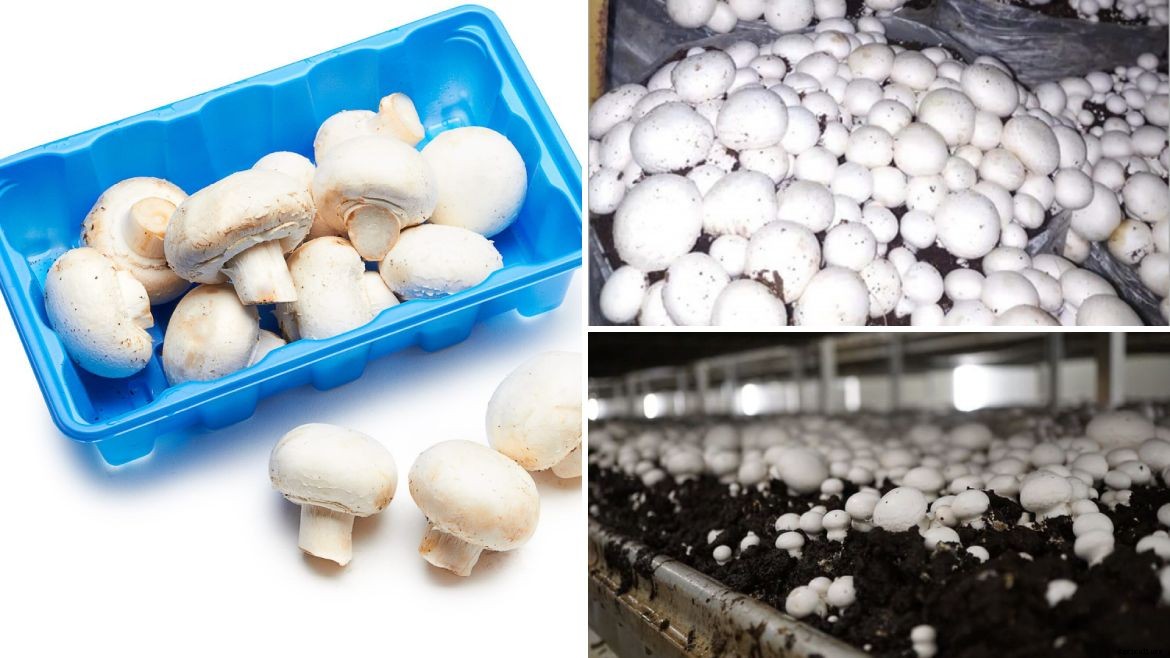
Traying the compost for button mushroom
- The size of the tray assumed in this guide is 1meter x 0.5meter x 0.15meter.
- Compost is filled in the tray with the depth of 15-18 cm.
- The compost should be compressed gently at the surface only.
- Make sure there is sufficient spacing between the trays when they are stacked over each other. A spacing of 15 cm is advisable.
- Mixing spawns with the compost is called spawning.
- There are various spawning techniques used:
- Spot spawning:5 cm deep hole is made in the compost and lumps of spawns are placed in the hole. The spacing of spawns is 20-25 cm. the holes are later covered with compost.
- Surface spawning:the spawns are evenly layered across the compost and mixed at a depth of 3-5 cm. later the top is covered with a thin layer of compost.
- Layer spawning:3 to 4 layers of spawn are mixed with compost, and later covered with a thin layer of compost.
- The spawn is mixed with the compost at a rate of 7.5 ml/kg or 500-700 grams / 100 kg compost.
- 500 grams of spawn is enough for 5 standard trays.
- The trays are stacked after spawning.
- There must be a spacing of 1 meter from the ceiling and the topmost tray.
- The spawned compost is now covered with newspaper or plastic sheets.
- The fungal thread will take 12 – 14 days to colonize the entire compost.
- The temperature maintained in the cropping room is 24±2 degrees Celsius.
- Relative humidity should be around 90%. The floor and the walls of the room can be watered to raise humidity if needed.
- Higher carbon dioxide concentration in the air added benefits in this stage of mushroom farming.
- After spawn run completion, the compost bed should be covered by casing of about 3-4 cm thick.
- The casing should be porous, should be able to hold water and should have a pH level of 7 – 7.5.
- Peat moss is considered as best casing material.
- Mixture of garden solo argiloso and sand (4:1), spent compost (2–3-year-old), cow dung and loam soil (1:1); burnt rice husk, sand and lime are commonly used casing materials.
- The casing has to be posturized before application. For pasteurization you can steam the soil or use formaldehyde (2%) and bavistin (75 ppm).
- Casing pasteurization should be done at least 10 days before its use in the compost.
- After application of casing the temperature is maintained for 24±2 degrees Celsius and relative humidity of 85-90% is maintained.
- The temperature is slowly reduced every day by almost 1 degree Celsius until it reaches 18 degrees Celsius.
- The cabon dioxide level in the air is lowered to 0.08-0.15% by ventilating the room.
- The “initials” will start merging to form pinheads, eventually moving into button forming stage.
- First flush, bloom or break appears after almost 3 weeks of casing or 5 to 6 weeks of spawning.
- It is very important to layer the casing properly as if it too thick, the musrooms will come out as dirty.
- Harvesting is done in button stage when the caps/veils measure 2.5 to 4 cm.
- The mushrooms should be harvested by lightly twisting the stem without disturbing the casing soil.
- The gaps after harvesting should be again filled with casing soil and watered.
- Per tray you can expect 3 to 6 kg of mushrooms depending on the precise care and maintenance given in every individual stage of mushroom farming
- 18-20 kg per 100 kg of compost is a desirable crop yield of 2 months old culture.
Canning is the most preferred storage technique. This makes it easy for export.
Apart from canning, freeze drying, pickling and IQF are also some practices followed.
Button mushrooms are not usually dried unlike oyster, shitake or paddy mushrooms.
Mushrooms are highly perishable commodities and hence should be transferred to a cold room as soon as they are harvested.
Button mushrooms can be stored in 4-5 degrees Celsius for 3-4 days.
Button mushrooms should not be washed. But in case washing is required, a mix of 10 liters of water with 5-gram Potassium metabisulphite must be used to remove dirt.
Modified atmosphere packaging or controlled atmosphere packaging is also used in some places.
Guide to paddy straw mushroom farming in India
One of the oldest and commonly used techniques of mushroom farming is paddy straw mushroom farming. It’s an edible mushroom of the tropics and subtropics.
Andhra Pradesh, Kerala, Orissa, Tamil Nadu and west Bengal are the states producing paddy straw mushrooms in India. But since the yield (10-15% of dry substrate) of this cultivation technique is low, the overall yield from these states is also very low.
Indoor Cultivation Technology has increased the yield (35-40% biological efficiency) of paddy straw mushrooms and has brought paddy straw mushroom cultivation at semi-industrialized status.
The indoor cultivation method of paddy straw mushroom has following components and steps:
Substrate for paddy straw mushrooms
- Paddy straw
- Cotton waste is more preferable option of paddy straw.
- Since cotton waste has more cellulose and hemi-cellulose, it can retain more moisture and eliminates the need of water in later stages of cropping.
- This also helps in minimizing the risk of damaging the primordia.
Preparing the compost for paddy straw mushrooms
- The substrate such as paddy straw or cotton ginning mill waste or a mix of paddy straw and cotton ginning mill waste with a ration of 1:1 is wetted for the first 2 days.
- 5% Poultry manure is added to the pile of dimensions 1.5meter high x 1.5meter wide.
- Contudo, nothing will be added to cotton ginning mill waste.
- The compost is turned twice in two days (1 turning each day)
- On the third turning, 1.5% calcium carbonate is added to the compost and is left for fermentation for the next 2-3 days.
Pasteurization and bedding for paddy straw mushrooms
- The compost is spread on shelves or beds after outdoor composting for almost 3-4 days.
- The thickness of the beds is dictated by the season in which the cultivation is being done. The thickness of the bed ranges from 5cm to 10cm.
- In summers less thickness of the bed is preferred.
- The compost is spread evenly and after 12 hours the compost is subjected to steam.
- A temperature of 60 degrees Celsius is maintained for 4-5 hours for cotton waste compost and a temperature of 65 degrees Celsius is maintained for almost 6 hours for paddy straw compost. This method posturizes the compost.
- The compost is then kept at a temperature of 50 degrees Celsius for the next 36 hours and then it’s allowed to cool naturally.
Spawning of paddy straw mushrooms
- The spawning process can be started when the compost cools down to a temperature of 35 degrees Celsius.
- Spawns of paddy straw mushrooms are called grain spawns as they are made of grains of cereals or millets.
- Spawns made of soaked paddy stray are called straw spawns.
- The compost is spawned with fresh spawn @ 1.5% (dry weight) or 0.4% (wet weight) basis of the compost.
- The spawns are inserted 2 to 2.5 cm deep in the compost with a spacing of 12 to 15 cm.
- The bed of compost is covered with thin plastic sheet after covering the spawns with compost.
Spawn running of paddy straw mushrooms
- A fixed temperature of 32 to 34 degrees Celsius is maintained for the spwan run.
- This temperature is ideal for colonization of the compost.
- Cotton waste compost takes 4-5 days to colonize whereas paddy straw compost takes 5-6 days for colonization.
Crop management and fructification of paddy straw mushrooms
- In the stage of spawn running, make sure there is adequate ventilation.
- Water and light are not necessary.
- After 4 days, you can add fluorescent lights in the room.
- The plastic sheets used to cover the compost in spawning step are now removed on the 5
º
day and water is gently sprayed over the beds.
- The pinhead starts emerging on 5-6
º
day of spawning.
Harvesting of paddy straw mushrooms
- The first bloom or break or flush of paddy straw mushrooms can be seen after 4 to 5 days of pinhead formation.
- Relative humidity of 80%, temperature of 30 degrees Celsius, regular fresh air and fluorescent lights can significantly increase the yield.
- Mushrooms can be harvested as early as when the volva just breaks and reveals the mushroom.
- This mushroom grows very fast and hence sometimes it is harvested twice or thrice a day.
- The first flush constitutes 70 – 90% of the total mushroom yield.
- Harvesting should be done by gently lifting, shaking and slightly twisting the mushroom from the bed.
- Reframing from cutting the mushrooms using tools while harvesting. The stalk left behind in the bed might result in infestation of pests and lead to decreased yield.
Guide to Oyster/ Dhingri mushroom farming in India
Technology used for the cultivation of the culinary and medicinal mushroom Pleurotus Spp. Often regarded as an oyster mushroom, has been standardized on locally available substrates.
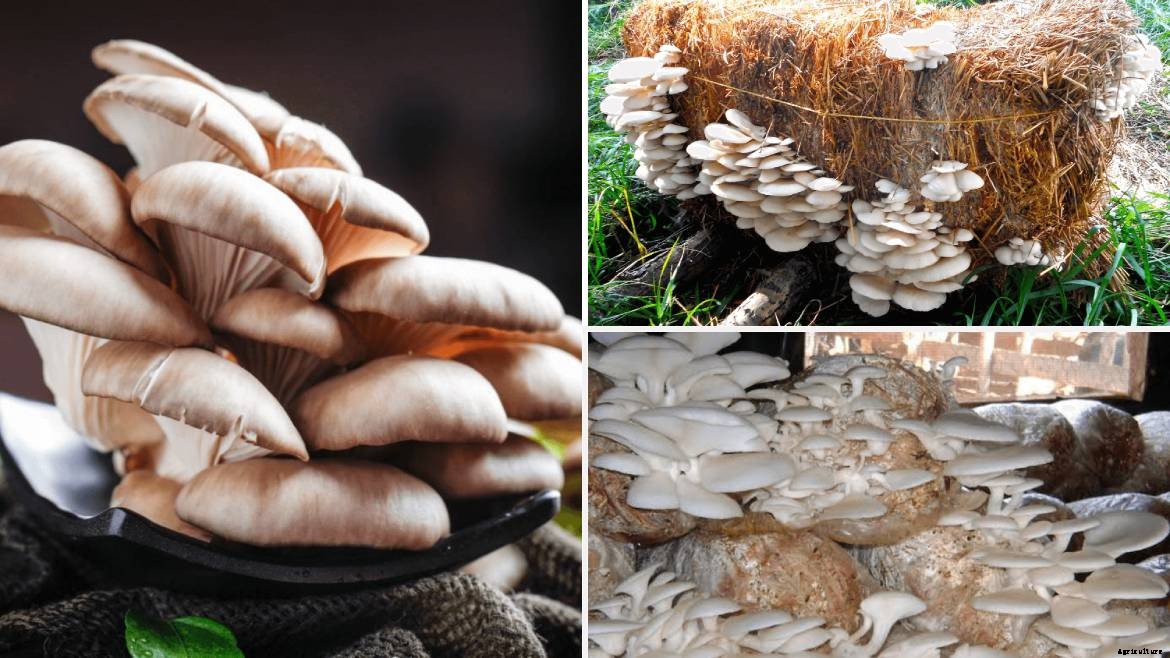
The cultivation of pink, cinzento, Branco, amarelo, marrom, and black oyster mushrooms is the same; there are only minor differences in the duration of spawn running and cropping.
Oyster mushrooms are easy to grow. Atualmente, it is very popular in many countries, particularly in South-East Asia, where cultivation of button mushrooms is not feasible under natural climatic conditions.
Substrate for oyster mushroom cultivation
- Substrate for oyster mushroom cultivation can be all kinds of cellulosic farm wastes.
- Banana pseudo stems, cotton ginning mill waste, leaves of maize, used citronella leaf, sugarcane bagasse, serragem, juta, used tea leaf waste, synthetic compost of button mushrooms, paper mill sludges, coffee byproducts, tobacco waste, cereal straw and waste paper are some of the substrate options.
- Paddy straw is the most commonly used substrate.
Compost preparation for oyster mushroom cultivation
- The substrate is chopped into 1 to 2 cm long pieces, and soaked in water for 2 to 3 hours.
- Pasteurization of the substrate depends on the level in which farming is being done.
- Small scale production:soaked in hot water at 80 degrees Celsius for 2 hours
- Semi- commercial production:Steamed at a temperature of 80 degrees Celsius in steam chamber.
- Full-fledged commercial production:substrate is subjected to 121 degrees Celsius temperature with 15-pound op pressure for 15 minutes in an autoclave.
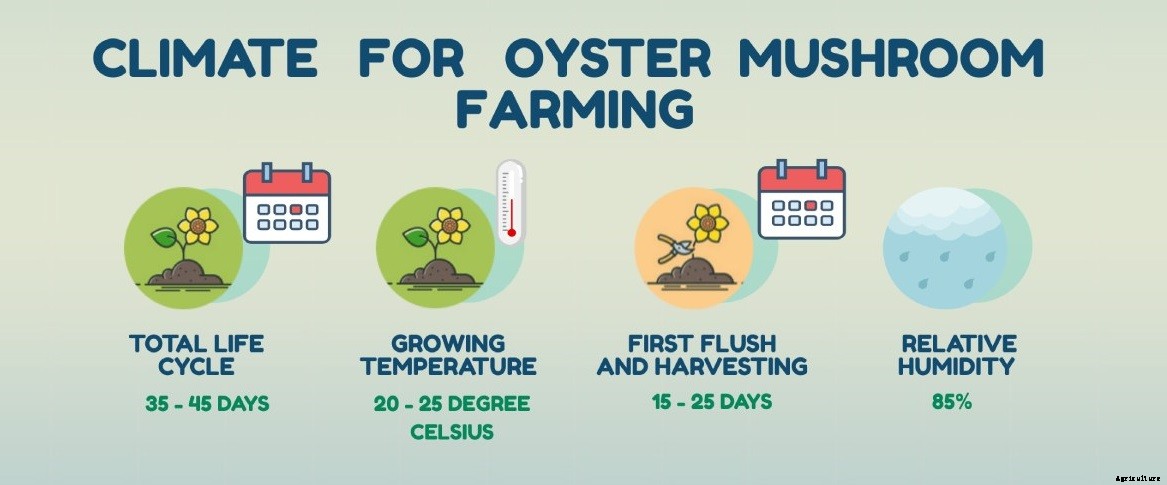
Spawning of oyster mushroom
- The pasteurized substrate is brought to a temperature of 65 degrees Celsius and is packed in polypropylene bags.
- The bags are plugged with non-absorbent cotton.
- The bags are filled 2/3 with the substrate and 1/3 with air.
- 40 grams of grain spawn can be mixed with 1 kg of substrate.
Spawn running of oyster mushroom
- The polypropylene bags are then put in a dark room with a temperature of 24-28 degrees Celsius for 18-30 days.
- The number of days can differ depending on the variety of the oyster mushroom being farmed.
Crop management and fructification of oyster mushroom
- After the designated number of days, the bags are then moved to a cropping room.
- Holes are made on the polypropylene bag. The holes can be of 2 cm in diameter with a spacing of 4 cm.
- Pinhead will start emerging from the openings within 2 to 7 days depending on the variety.
- The adequate temperature ranges from 13-30 degrees Celsius and relative humidity ranges from 80 to 85%, depending on the variety of the oyster mushroom.
- In almost 2 weeks the substrate inside the bags become compact. At this point you can cut the bags and place the compact substrates on shelves.
Harvesting of oyster mushroom
- Harvestable crop will appear in almost 3 weeks.
- The compact substrate cylinders now have a growth of oyster mushrooms on the outside.
- The best time to harvest the oyster mushrooms is when the cap starts folding.
- The fist flush can appear in 18-20 days and the subsequent second and third flush can appear in an interval of 7 days.
- You can cut the oyster mushrooms with a tool or pluck it from the substrate gently by twisting.
Guide to Milky mushroom farming in India
Milky mushrooms are named so because they are milky white in colour. It is the only species of mushroom that is indigenous to, and cultivated in, the hot, moist climate of India.
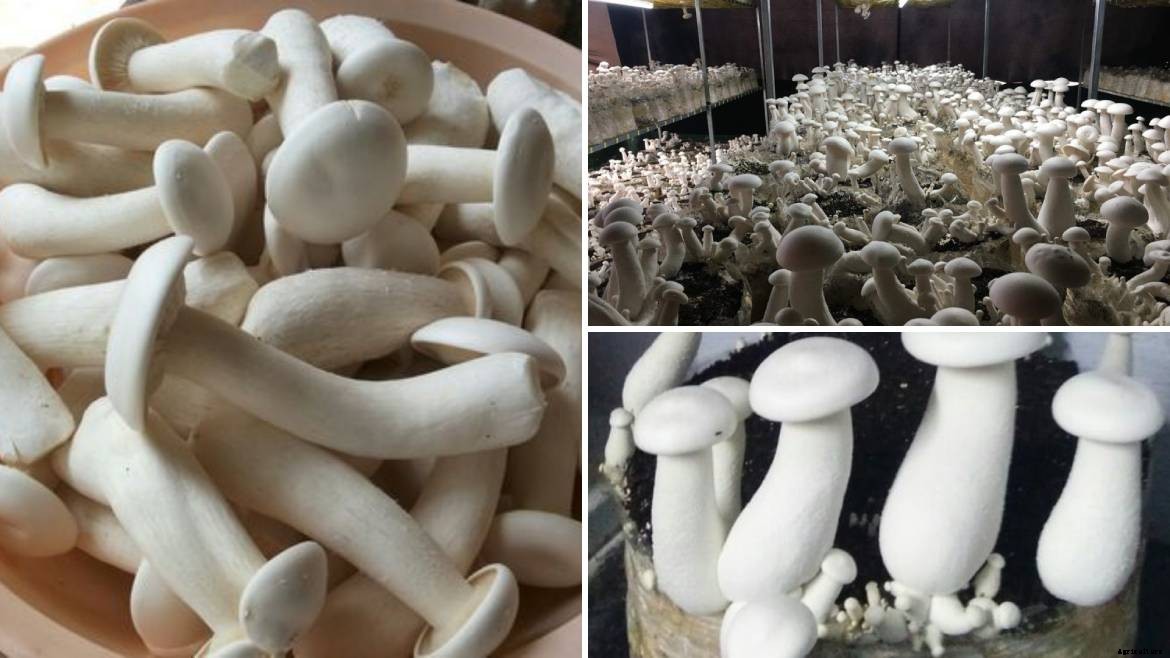
It is also known as “Swetha” mushroom or “summer” mushroom. It’s a tropical mushroom which can grow to be quite long and thick.
Karnataka, Tamil Nadu, Kerala, Odisha and Andhra Pradesh are the states in India having suitable climatic conditions to growth of milky mushrooms.
Substrate for milky mushrooms
- Banana pseudo stems, cotton ginning mill waste, leaves of maize, used citronella leaf, sugarcane bagasse, serragem, juta, used tea leaf waste, synthetic compost of button mushrooms, paper mill sludges, coffee byproducts, tobacco waste, cereal straw and waste paper are some of the substrate options.
- Paddy straw is the most commonly used substrate.
Compost preparation for milky mushrooms
- Substrate can be chopped in size of 4 to 5 cm or 1 to 2 cm.
- Substrate is soaked in clean water for almost 6 hours.
- Pasteurization of the substrate depends on the level in which farming is being done.
- Small scale production:soaked in hot water at 80 degrees Celsius for 2 hours
- Semi- commercial production:Steamed at a temperature of 80 degrees Celsius in steam chamber.
- Full-fledged commercial production:substrate is subjected to 121 degrees Celsius temperature with 15-pound op pressure for 15 minutes in an autoclave.
- At the end of this process the moisture content of substrate should be around 60%.
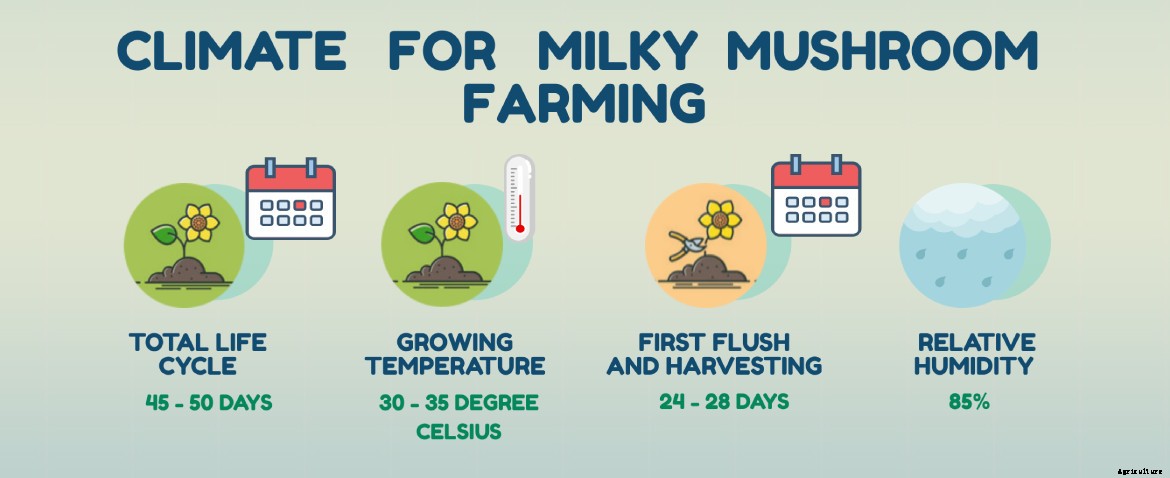
Spawning of milky mushroom
- The substrate is kept in Polythene tube of dimensions 60 cm x 40 cm and a thickness of 100 gauge.
- Organic supplements like wheat bran, casca de arroz, maize meal or boiled wheat grain can also be added per bag. 100 grams per bag should be enough.
- The substrate in put in the tubing to a height of 7.5 cm and 35 grams of spawn is mixed with the substrate.
- Three such layers are made and the bag is closed with an insulating material like cotton.
- The bag is lined with holes of 1 cm diameter for gas exchange. 20 such holes per bag are enough.
Spawn running of milky mushrooms
- The bags incubated in a dark room with temperature of 30 to 38 degree Celsius and relative humidity of 80%.
- The bags are kept in a dark room for 25-30 days.
Casing of milky mushrooms
- Red soil or a mixture of red soil and Decomposed coir compost (1:1 ratio) is a good casing material for milky mushrooms cultivation bags.
- The pH of the casing soil should be around 8.
- The thickness of the casing is 2-3 cm.
- Make sure to posturize the casing soil with chalk powder and kept in 15 psi in autoclave for few hours.
- Posturizing the casing soil can also be done with 4 % formaldehyde a week before it is applied to the bags.
- Proper turning of the casing soil is done regularly to eliminate most of the traces of formalin.
- For casing of the bags, the bags are open and a uniform layer of casing material is allied to the substrate with the spawn.
Crop management and fructification of milky mushroom
- After almost 10 days, the mycelium will penetrate the casing layer.
- As the pinheads start appearing, the bags are moved to cropping room with a temperature of 30 to 38 degrees Celsius and relative humidity of 80 to 85%.
- The room should have adequate light and ventilation as well.
Harvesting of milky mushroom
- When the milky mushrooms grow to a diameter of 8 to 10 cm, the crop is harvested.
- The milky mushrooms are harvested by twisting gently from the base.
- By using this cultivation method, a 6-week crop can yield almost 1 kg of mushrooms per bag.
Guide to Shiitake mushroom farming in India
Shiitake mushroom, an edible and medicinal mushroom can be easily grown for commercial purposes.
It is not only a good source of protein and vitamin B, but its zero fat and sugar content make it a very good option for diabetics and heart patients.
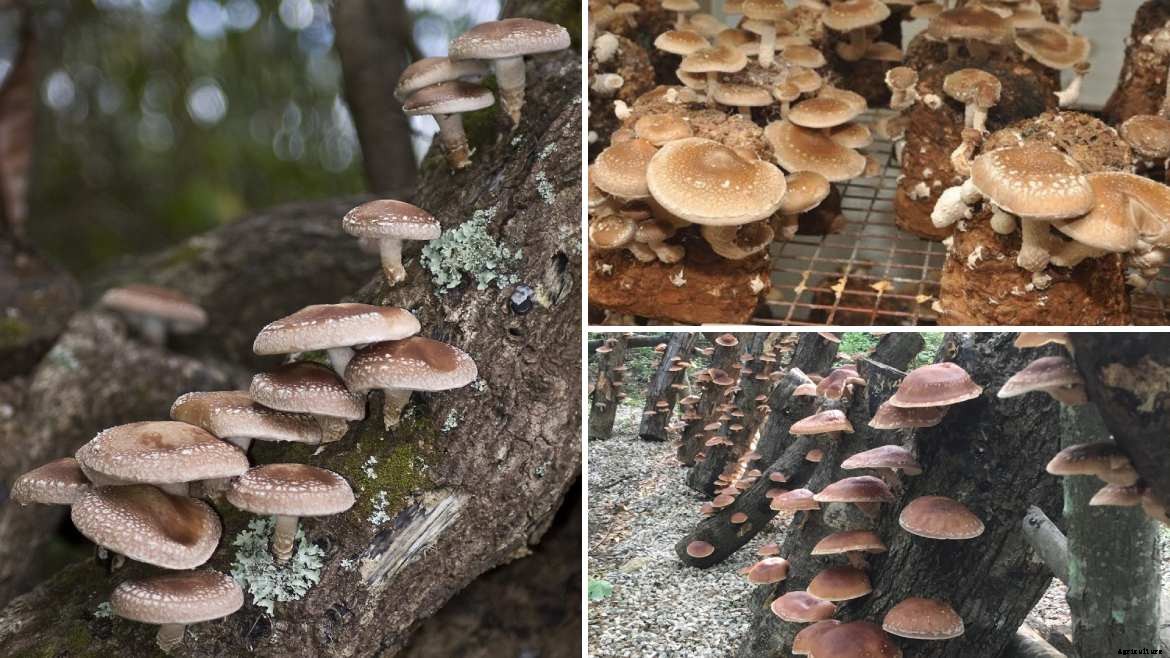
Lentinan, a compound extracted from these mushrooms, is also used in manufacturing of a drug for cancer.
It can be cultivated in hardwood sawdust of teakwood, Sal and Indian Kino tree.
Substrate for Shiitake mushrooms
- Farelo de arroz, farelo de trigo, lascas de madeira, hard wood sawdust, eucalyptus sawdust, teakwood saw dust, and calcium sulphate are some of the substrate options.
- Saw dust should not be a fine powder, as water logging with reduce the speed of growth of mycelium.
- A very coarse saw dust is also not recommended as it is hard to pack in bags and your compost will contain too much air.
- A mix of coarse and fine sawdust is generally preferred.
Compost preparation for Shiitake mushrooms
- Sawdust is wetted for few hours.
- The substrate should not be wetted heavily. A good hydration test is squeezing the substrate in your hand as tightly as possible and only few drops of water should drip.
- If there are dry patches, add little bit of water.
- Good hydrated substrate ratio examples can be a mix of 1kg of sawdust, 250g of wheat/rice bran and 1.6 L of water OU 1Kg of sawdust and 1.5L of water OU 1Kg of wheat/rice bran with 0.5 L of water.
- Pasteurization of the substrate can be done by subjecting it to 121 degrees Celsius temperature with 15-pound op pressure for 120 minutes in an autoclave.
- At the end of this process the moisture content of substrate should be around 65%.
Spawning of Shiitake mushroom
- The substrate is kept in Polypropylene bags.
- 1 Kg of substrate is mixed with 40 grams of spawning material.
- Unlike other bag mushroom farming methods, no holes for ventilation are required in this case.
Spawn running of Shiitake mushrooms
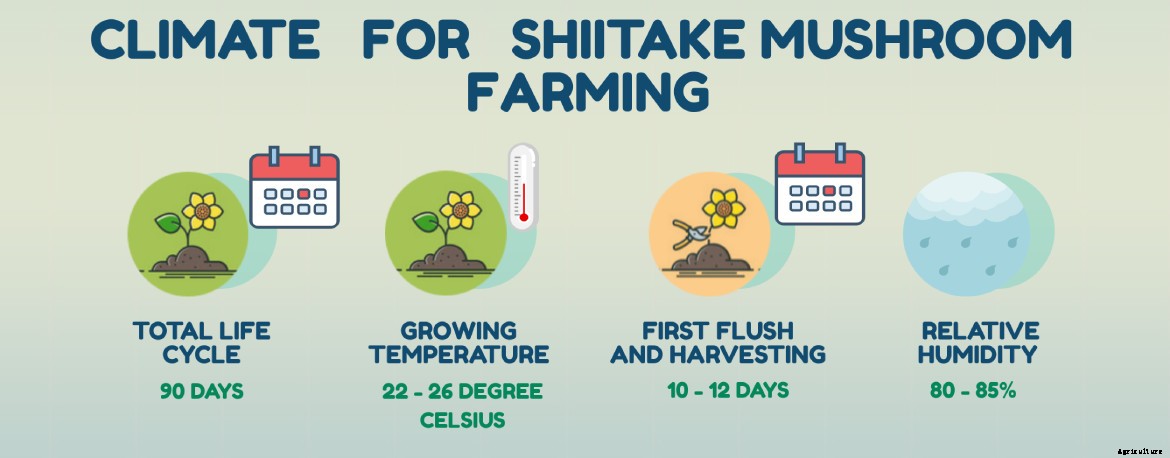
- The bags incubated in a dark room with temperature of 22 to 26 degree Celsius.
- The bags are kept in a dark room for 60-70 days.
- Mycelial coat formation (a white substance) will start followed by the formation of blisters.
Crop management and fructification of Shiitake mushroom
- Tipicamente, Shiitake mushrooms take 8-12 weeks to colonize.
- When the substrate turns completely brown, remove the Polypropylene bag. And moved to a cropping room.
- The brown blocks are now shock treated with spraying cold water with a temperature of 10 to 15 degrees Celsius.
- After 10-12 days of shock treatment, the shiitake mushrooms are ready to harvest. but this also depends on how cold is the weather.
- As the pinheads start appearing in the cropping room with a temperature of 22 to 26 degrees Celsius and relative humidity of 80 to 85%.
- The room should have adequate light and cross ventilation as well.
Harvesting of Shiitake mushroom
- When the milky mushrooms grow to a diameter of 3 to 6 inches, the crop is harvested.
- The milky mushrooms are harvested by twisting gently from the base.
- Harvest the Shiitake mushrooms when the gills underneath the mushrooms are visible and the outer edge is slightly curved.
- If the edge of the mushroom is flat, then the mushroom is over ripped. It is still edible though.
- Don’t wash the mushrooms after harvesting.
- Immediately refrigerate the mushrooms within 1 hour of harvesting.
Guide to Reishi mushroom farming in India
Reishi mushroom is mostly cultivated because of its pharmacological importance. Global trade of this mushroom has crossed more than 2 billion dollars. This makes this mushroom as good candidate for cultivation commercially.
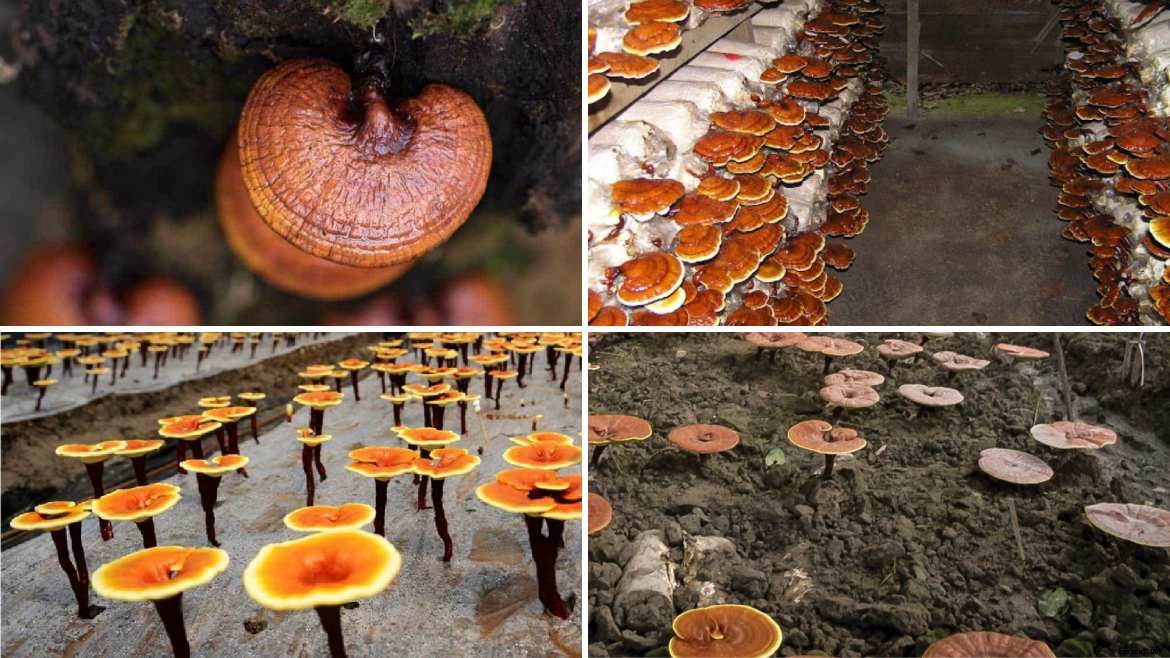
It is considered as almost a panacea in few cultures like Japanese and Chinese. It is believed to have medicinal characteristics such as anticancer, antioxidantes, hypoglycemic, anti-HIV, anti-heart attack, cholesterol lowering as well as anti-angiogenic.
Since this mushroom is grown exclusively for medicinal purposes, its farming should be done organically.
It can be grown in poly-houses and also in the environmentally-controlled cropping rooms.
These mushrooms are typically naturally found in dead or dying hardwood in warmer temperatures in the month of May to November.
Substrate for Reishi mushrooms
- Organically supplemented hardwood saw dust like eucalyptus tree saw dust or teak wood saw dust.
- Saw dust of broad leaves trees like coconut, Sheesham and mango is also preferable.
- Saw dust should not be a fine powder, as water logging with reduce the speed of growth of mycelium.
- A very coarse saw dust is also not recommended as it is hard to pack in bags and your compost will contain too much air.
- A mix of coarse and fine sawdust is generally preferred.
Compost preparation for Reishi mushrooms
- Saw dust is mixed with 20% of wheat/rice bran.
- Sawdust is wetted for few hours.
- The substrate should not be wetted heavily. A good hydration test is squeezing the substrate in your hand as tightly as possible and only few drops of water should drip.
- If there are dry patches, add little bit of water.
- The desired pH level of 5.5 is obtained by adding calcium carbonate (chalk powder) and calcium sulphate (gypsum).
- Pasteurization of the substrate can be done by subjecting it to 121 degrees Celsius temperature with 15-pound op pressure for 120 minutes in an autoclave.
- At the end of this process the moisture content of substrate should be around 65%.
Spawning of Reishi mushroom
- The substrate is kept in Polypropylene bags with the mouth of the bag sealed with a non-adsorbent material like cotton.
- Sterilization of the bags is done in autoclave for 2 hours under a pressure of 22 PSI.
- The substrate in the bag is spawned with wheat grain or saw dust spawn at the rate of 3% of the total dry weight.
Spawn running of Reishi mushrooms
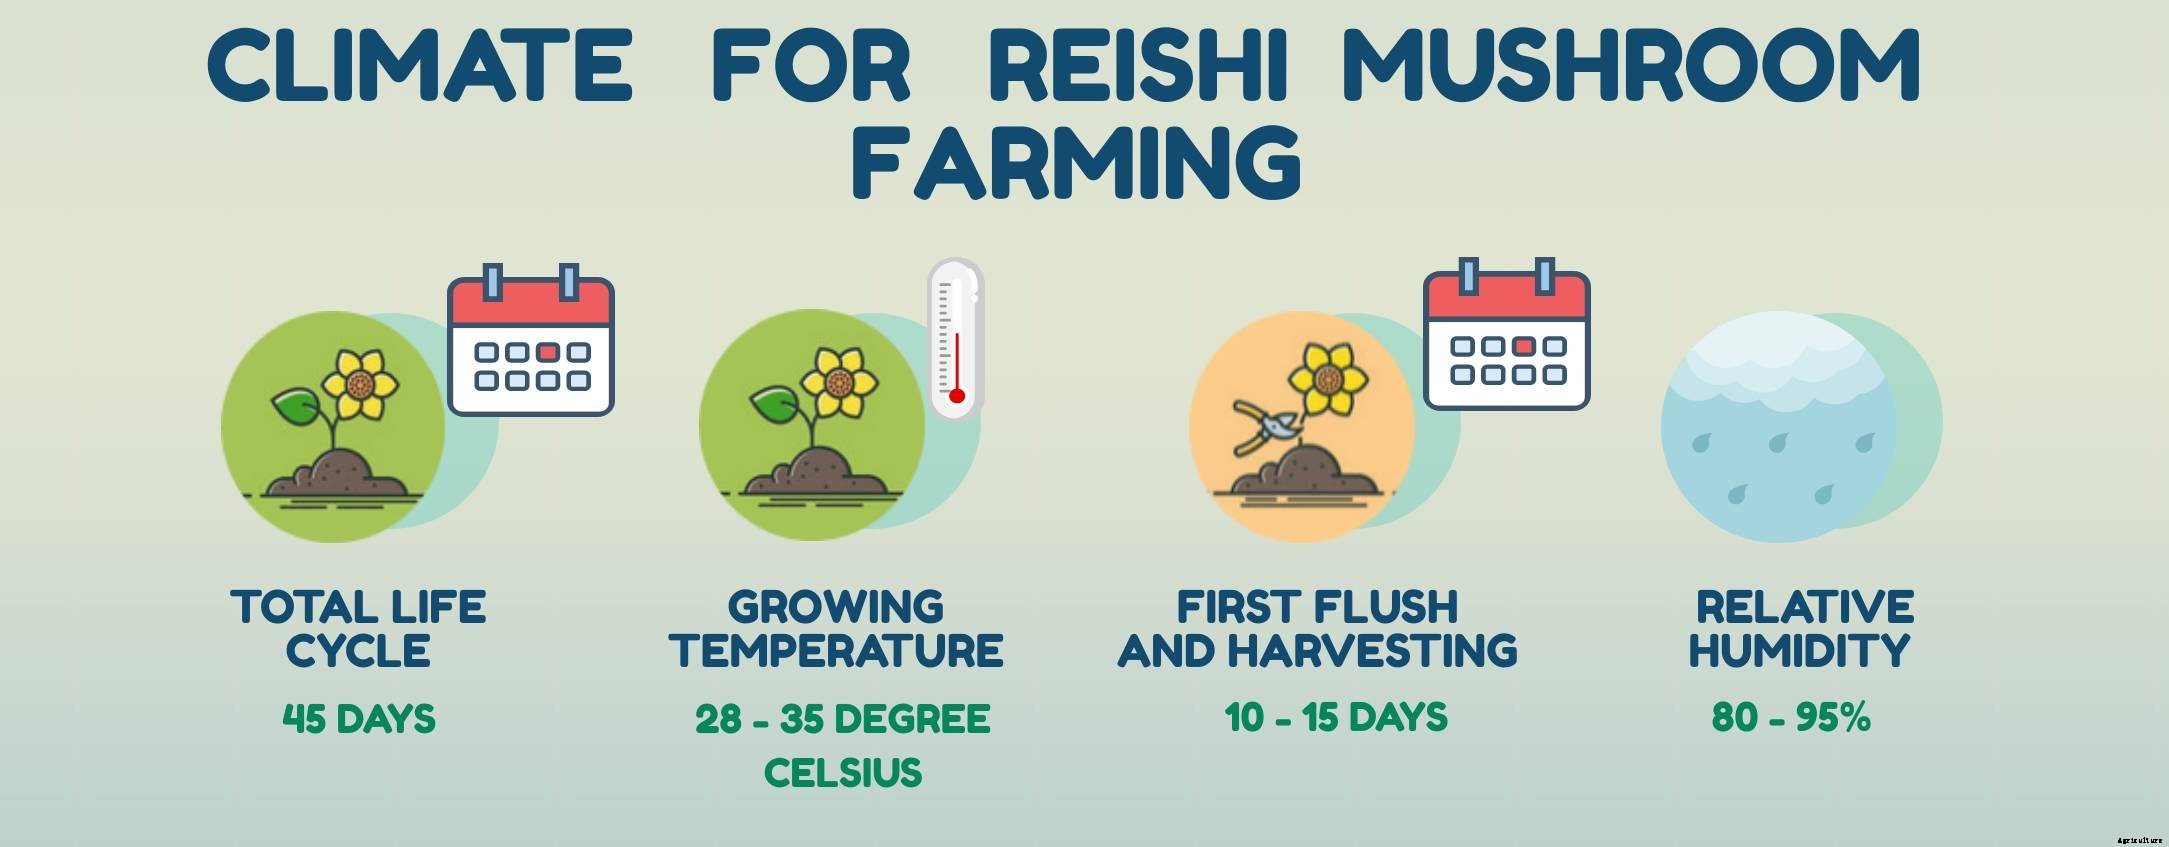
- The bags incubated in a closed dark room with temperature of 28 to 35 degree Celsius.
- The level of carbon dioxide is kept high in the incubation room.
- The bags are kept in a dark room for almost 25 days.
Crop management and fructification of Reishi mushroom
- After 25-30 days of incubation, the top part of the Polypropylene bag is cut off at the level of top part of the substrate.
- Fruiting and pinning will start happening at this point .
- The adequate environmental conditions like temperature of 28 degree Celsius, 800 lux light, 95% relative humidity and 1500 ppm carbon dioxide, are provided to the bags.
- Humidity is reduced to 80% once the pins have started growing flatter whitish tops.
- Now is the time when fresh air is also introduced to reduce the carbon dioxide levels to 1000 ppm.
- When the caps become yellowish in colour, the temperature is lowered further to 25 degrees Celsius along with further reduction in relative humidity to 60%.
Harvesting of Reishi mushroom
- Fully matured Reishi mushrooms have a reddish-brown top.
- The Reishi mushrooms are harvested by two hands. One hand is used to tightly hold the root and the other hand can be used to pulling the Reishi mushroom out.
- Harvest the Reishi mushrooms can also be done with cutting tools but it should be made sure that no residual steam is left on the compost log.
- The first flush of Reishi mushrooms can be seen in almost 2 weeks.
- After harvesting the first flush, again the environment of the room or polyhouse should be switched back to adequate environment for pinning. (i.e., 28 °C, 95%RH, 1500 ppm CO2, 800 lux light)
- 250 grams of Reishi mushrooms can be cultivated from 1 kg of substrate on an average.
- Mushrooms are washed with water after harvesting.
- Depois de lavar, Reishi mushrooms must be dried in temperatures lower than 50 degrees Celsius. A temperature of 35 degrees Celsius in drier cabinet is advisable.
Diseases and preventive measures in Mushroom cultivation
Some of the diseases of mushrooms are listed below:
| MUSHROOM DISEASES | SYMPTOMS | CONTROL AND PREVENTION |
| Mushroom flies | These flies are small, delicado, Preto, yellowish or sometimes brown with different types of wing venation and size. | Spring is inside the wall of the mushroom house.
The insecticide should be added in the last turning of the compost. |
| Ácaros | They are small in size and are Majorly white, amarelo, red and brown. They can be found running over the surface of the fruit bodies, mushroom beds and on the floors and walls of the mushroom houses.
The damage the crop by feeding on the spawn to make holes in the mushroom caps and stalks and cause stunting of fruit bodies as well as brown spots on the caps and stems. | Proper pasteurization of compost. Proper hygiene and sanitation.
Disinfection of the mushroom houses by spraying 0.1% dicofol. Burning sulphur in the empty room. |
| Springtails | They are silver-grey 2 brown colours with a light violet band along the sides of the body and black cellular fields present on the head.
They are the main species that damage mushrooms. They enter mushroom houses along with organic matter.
They feed on mycelium from spawn. They also feed on the gills of the oyster mushroom destroying the lining and spit out the mycelial strands at the base of the stripes.
They also attack the fruiting bodies of button mushrooms and cause slight pitting and browning at feeding sites. | Cleaning surrounding and inside of the mushroom house.
Proper disposal of spent compost. Proper pasteurization of composed and casing material.
Raising the crop above the floor level. |
| Brown plaster mould | Occurs on the cropping trees, initially cloudy white appearance later changes to brown.
Originally fungus rises in compost. too wet compost, high temp. (28-32) c during spawn run and cropping at more than 18 C encourages Infection. | Maintain suitable temp. during the spawn run and cropping 2% of formalin |
| Bubble disease:– C.O.:Mycogone perniciosa | Dense white mat of mycelium leading to reduction in yield.
Swollen stalk and smaller cap at early stage. Unpasteurized compost also leads to it. An amber liquid appears on infected mushrooms.
Mushrooms become brown. Bubbles may be as large as a grapefruit. It is also a parasite of wild mushrooms.
It produces two spore types, one which is small and water-dispersed like Verticillium. the second which is a large resting spore capable of persisting for a long time in the environment. | Beds sterilised @ 2% formalin. Spray dithane Z-78 @ 0.2 % and benlate @ 0.05%. |
| Dry bubble, brown spot disease:– C.O.:Verticillium malthousei or V. psialliste | Causes brown spot-on cap, resulting in irregular patches In severe infection mushroom become distorted.
Affected mushrooms becomes leathery | Dithane Z-78 @ 0.2% 3 times at casing.
Control of high temperature at casing and proper ventilation . |
| Bacterial disease:- Bacterial blotchC.O.:Pseudomonas tolaassi | Appearance of brown slightly sunken blotches on the mushroom cap Spots are irregular, yellowish to dark brown.
Main source of infection is infection soil and separate through flies, mites and nematodes. | Casing soil sterilization and proper ventilation . Use of chlorinated water.
Spray of terramycin @ 9mg/f on beds. |
Types of Mushrooms
Based on the purpose of this article, we can categorize types of Mushrooms in the following two categories.
Based on Scientific name (Genus, Species and Common name)
| GENUS | ESPÉCIES | COMMON NAME |
| Agaricus | arvensis | Horse Mushroom |
| augustus | The prince |
| bernardii | |
| bisporus | Common store mushroom |
| brunnescens | button mushroom |
| | commercial mushroom |
| bitorquis | Spring agaricus |
| rodmanii | |
| Campestris | Field or meadow mushroom |
| crocodilinus | Crocodile agaricus |
| fuscofibrillosus | Bleeding agaricus |
| haemorrhoidarius | Bleeding agaricus |
| Amanita | phalloides | Death cap |
| Armillaria | matsutake | Matsutake |
| mellea | Honey or oak mushroom |
| ponderosa | American matsutake or pine mushroom, |
| | recently renamed Tricholoma magnivelare |
| Auricularia | auricula | Cloud ear mushroom or Judas' ear |
| polytricha | Wood ear mushroom, |
| | tree ear, or black fungus |
| Boletus | aereus | |
| appendiculatus | Butter bolete |
| badius | Bay bolete |
| barrowsii | Barrow's bolete |
| bicolor | Two-colored bolete |
| edulis | Porcini, cèpe, or king bolete |
| mirabilis | Admirable bolete |
| pinicola | Variant of B. edulis |
| regius | Regal bolete |
| zelleri | Zeller's bolete |
| Bovista | vários | Puffball |
| Calbovista | vários | Puffball |
| Calvatia | gigantea | Puffball |
| Cantharellus | cibarius | Golden chanterelle or egg mushroom |
| cinnabarinus | Cinnabar-red chanterelle |
| lateritius | Smooth chanterelle |
| subalbidus | White chanterelle |
| tubaeformis | Trumpet chanterelle |
| Chlorophyllum | molybdites | Green-spored parasol mushroom |
| morgani | |
| Clitocybe | fragrans | Fragrant clitocybe |
| odora | Anise-scented |
| nuda | Blewit |
| Clitopilus | prunulus | Sweetbread mushroom |
| Coprinus | atramentarius | Alcohol inky cap |
| comatus | Shaggy mane, lawyer's wig, or inky cap |
| micaceus | Mica cap |
| Cortinarius | armillatus | Bracelet cortinarius |
| Craterellus | cornucopioides | Horn of plenty, trumpet of death, |
| | or black chanterelle |
| Entoloma | abortivum | Aborted entoloma |
| Flammulina | velutipes | Enoki, velvet foot, golden needle, |
| | or winter mushroom |
| Gomphus | clavatus | Pig's ear |
| Grifola | frondosa | Hen of the woods |
| Polypilus | | |
| Gyromitra | gigas | Snowbank false morel |
| Helvella | lacunosa | Black saddle mushroom |
| Hericium | coralloides | Coral hericium |
| caput ursi | |
| americanum | |
| erinaceus | Bear's head, monkey head, or pom-pom |
| ramosum | Comb tooth mushroom |
| Hydnum | repandum | Hedgehog mushroom or sweet tooth |
| umbilicatum | Belly-button mushroom |
| Hygrophorus | russula | Russula like waxy cap |
| Lactarius | deliciosus | Delicious milky cap |
| fragilis | Candy cap |
| índigo | Blue milky cap |
| rubrilacteus | Bleeding milky cap |
| Leccinum | aurantiacum | Orange-capped scaber stalk |
| insígnia | Aspen scaber stalk |
| manzanitae | Manzanita scaber stalk |
| scaber | Scaber stalk |
| Lentinus | edodes | Shiitake, black forest mushroom |
| Lepiota | molybdites | Green-spored parasol |
| Chlorophyllum | | |
| Lepiota | procera | Parasol mushroom |
| rhacodes | Shaggy parasol mushroom |
| | or drumstick mushroom |
| Lepista | nuda | Blewit |
| Clitocybe | | |
| Lycoperdon | vários | Puffball |
| Marasmius | oreades | Fairy-ring mushroom |
| scorodonius | Garlic marasmius |
| Morchella | angusticeps | Morel or sponge |
| conica | Morel or sponge |
| deliciosa | Morel or sponge |
| esculenta | Morel or sponge |
| Phlogiotis | helvelloides | Apricot jelly mushroom |
| Pholiota | nameko | Nameko |
| aurivella | Butter mushroom |
| Pleurocybella | porrigens | Angels' wings |
| Pleurotus | ostreatus | Oyster mushroom |
| sajor-caju | Oyster mushroom |
| Pluteus | cervinus | Fawn mushroom |
| Polypilus | frondosa | Hen of the woods |
| Grifola | | |
| Polyozellus | multiplex | Clustered blue chanterelle |
| Polyporus | umbellatus | Umbrella polypore |
| Ramaria | botrytis | Red-tipped coral mushroom |
| Rozites | caperata | Gypsy mushroom or chicken of the woods |
| Russula | aeruginea | Tacky green russula |
| cyanoxantha | Charcoal burner |
| delica | Short-stem russula |
| nigricans | Blackening russula |
| vesca | Bare-toothed russula |
| xerampelina | Shellfish-scented russula |
| Sparassis | crispa | Cauliflower mushroom |
| radicata | |
| Strobilomyces | confusus | Old man of the woods |
| floccopus | |
| Stropharia | rugosoannulata | Wine-cap stropharia |
| Suillus | brevipes | Short-stalked slippery cap |
| granulatus | Dotted-stalk suillus |
| pictus | Painted suillus |
| Terfezia | bouderi | Black kame |
| claveryi | Brown kame |
| Tremella | fuciformis | Snow mushroom, white jelly fungus, |
| | or silver ear mushroom |
| Tricholoma | flavovirens | Man on horseback |
| equestre | |
| magnivelare | Pine mushroom or American matsutake |
| Tuber | aestivum | Summer truffle |
| gibbosum | Oregon white truffle |
| magnatum | Italian white truffle |
| melanosporum | French black truffle |
| texensis | Texas white truffle |
| Volvariella | volvacea | Straw mushroom or paddy straw mushroom |
Based on local Indian Mushroom variety (Cultivated in India for edible and medicinal purposes)
- Agaricus Bisporus
- Pleurotus Sajor-caju
- Volcvariella Volvacea
- Calocybe Indica
- Pleurotus Ostreatus
- Auricularia Spp.
- Pleurotus Florida
- Lentinula Edodes
- Pleurotus Djamor
- Ganoderma Lucidum
- Pleurotus Eryngii
- Hypsizygus Tessulatus
Palavras finais
Mushroom farming in India has seen a considerable growth worldwide. Its not only being farmed for dietary consumption but also for medicinal purposes. One of the most attractive aspect of doing mushroom farming is, its still very lucrative even if done in a small scale.
Mushroom farming in India presents itself as a very good business idea for not only budding entrepreneurs / farmers but also veterans of agriculture.
Espero que este artigo tenha respondido a muitas de suas perguntas. Por favor, sinta-se à vontade para comentar seus pensamentos. Qualquer sugestão ou conselho será muito apreciada. Também, por favor, poste quaisquer perguntas que ainda não tenham resposta. Eu ficaria feliz em ajudar. Please feel free to share the article with anyone who you think is in need of assistance in gaining information on mushroom farming / mushroom cultivation.


