INTRODUÇÃO
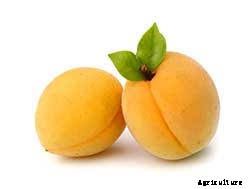
O damasco (Prunus armeniaca) é uma fruta de caroço, assim como as ameixas, pêssegos, nectarinas, cerejas, e amêndoas. A fruta de caroço tem uma única semente coberta por uma camada dura, tegumento espesso de semente (ou 'casca'); Juntos, a semente (ou 'kernel') e o tegumento são chamados de 'caroço' ou 'pedra'. Tanto o grão quanto a casca têm usos econômicos, além do valor alimentar da polpa do fruto.
Tempo de semeadura:
O damasco floresce no início da primavera e tem um curto período de maturação, de modo que está pronto para o mercado de produtos frescos no início do verão (maio ou junho) nas planícies ou de setembro a outubro nas terras altas. Os damascos são cultivados em árvores que atingem alturas de 3 a 13 m. O fruto tem 3,5 a 6,5 cm de largura e leva de 3 a 6 meses para se desenvolver e amadurecer. Após a colheita, os damascos têm vida útil extremamente curta e precisam ser consumidos frescos em alguns dias; de outra forma, a fruta deve ser seca ou processada para suco, geléia, ou enlatamento. As flores contêm partes masculinas e femininas e a maioria dos damascos são autoférteis, embora eles definirão uma colheita melhor se outra variedade estiver disponível como polinizadora. Alguns damascos não são autoférteis e requerem polinizadores compatíveis. A polinização é por insetos, geralmente abelhas melíferas. As árvores têm botões separados para flores e folhas e os botões de flores são mais suscetíveis a geadas matadoras ou muito pouco frio, que também pode matar os botões das flores. As flores e os frutos formam-se tanto na madeira com um ano de idade como em rebentos curtos de longa duração (esporas). As esporas são produtivas por 3 a 5 anos e os frutos da mais alta qualidade nascem nas esporas mais jovens. A maioria dos damascos começa a frutificar no segundo ano, mas o rolamento substancial não começa antes de 3-5 anos. Os frutos requerem 3-6 meses para o desenvolvimento, dependendo da cultivar. Os frutos variam em tamanho de 30 a 120 gramas. A polpa dos frutos é amarela, laranja, ou branco. A polpa é densa, carnudo e de alta qualidade. Os conteúdos de açúcares são de 6,2-20%, ácidos'- 0,25-1,8%. Uma safra média de uma árvore de 20-30 anos chega a 150-600 quilogramas, e 100-300 centros de um hectare. As variedades diferem com base na tolerância ao frio e na exigência de resfriamento, Precocidade (quão jovem é uma árvore quando começa a florescer), Época de florescimento e maturidade, Tamanho da fruta, forma, pele e cor da carne, firmeza, liberdade do poço, textura e sabor da carne Carga vegetal Resistência a doenças Planejando o pomar.
Propagação:
Quando os damascos não são cultivados em suas próprias raízes, a variedade copa é enxertada em um porta-enxerto que é produzido a partir da semente (então chamado de "muda"), ou produzidos a partir de estacas. As duas formas de enxerto usadas para produzir damascos são (1) enxerto de botões e (2) enxerto de chicote e língua.
Enxertia de gemas
Diagrama ilustrando a técnica de enxerto de gemas
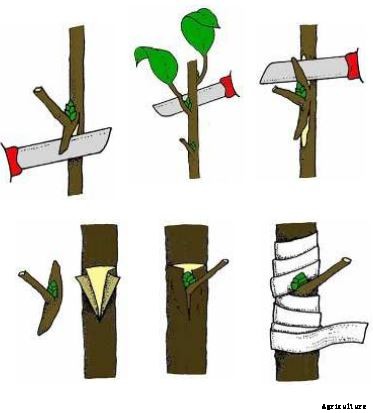
- Corte uma fatia do botão e da casca da árvore-mãe.
- Corte uma lasca semelhante do porta-enxerto, fazendo um pequeno lábio na base para encaixar o herdeiro.
- Junte os dois e ligue.
- Em tempo, o botão do herdeiro crescerá e se transformará em um broto, que se desenvolverá na árvore desejada.
Chicote e enxerto de língua
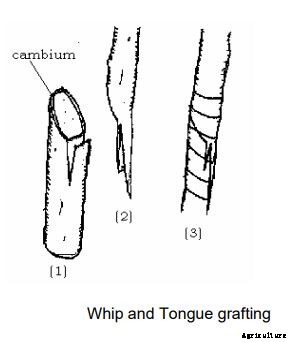
Diagrama ilustrando a técnica de chicote e enxerto de língua
- Faça um corte inclinado no porta-enxerto com uma 'língua' apontando para cima.
- Faça um corte correspondente na madeira da semente com uma 'língua' apontando para baixo.
- Junte os dois e amarre com fita adesiva, cobrindo bem o enxerto.
Seleção e preparação do local
A produção depende do tamanho da árvore, vigor e capacidade de colheita. Os fatores que mais limitam o tamanho das árvores nas áreas de fruticultura de Nangahar incluem:
- clima, especialmente a falta de água abundante por chuva ou irrigação, e geada, onde as temperaturas de inverno podem ser de -5 a -15 oC. Se a geada ocorrer na primavera, um pouco antes ou durante a floração, a colheita pode ser destruída.
- solo profundo, solos férteis otimizam o crescimento; solos pobres restringem o crescimento.
- fertilidade - para ser produtivo, as árvores se dão melhor com fertilizantes aplicados.
Seleção de local
Profundo, franco-arenosos bem drenados, com boa umidade e capacidade de retenção de nutrientes são os melhores solos para o cultivo de damasco. Não plante em solos salgados (salinos). A luz solar total quase o dia todo é essencial. As árvores que não recebem pelo menos 6 a 8 horas de luz solar direta por dia produzirão galhos longos e finos com poucas flores e frutos. Aqui está um teste simples para determinar a drenagem interna do seu solo - para ver se você tem um bom local para árvores frutíferas. Cave um buraco estreito de 1 metro de profundidade e encha-o com água. Se a água acabar em 24 horas, você não terá problemas para cultivar árvores frutíferas e nozes. Se a água acabar em 48 horas, o solo é aceitável, mas pode causar problemas. Se a água ainda estiver no buraco após 48 horas, em vez disso, cultive vegetais ou flores.
Proteção contra geada
Planejando o pomar para reduzir o perigo de geada na floração e no estágio de frutos jovens:As árvores plantadas em áreas abertas e as árvores expostas aos ventos frios predominantes têm maior probabilidade de sofrer danos causados pela geada. As áreas baixas coletarão ar frio; evite plantar em depressões ou bacias. Plantar perto de estruturas ou paredes, especialmente aqueles com uma exposição sudoeste, aproveitará o calor absorvido pela estrutura.
- Não plante em áreas baixas, onde o ar frio fica preso por colinas ou vegetação circundante.
- Certifique-se de que o solo está firme, úmido e exposto à luz solar removendo a cobertura do solo ou mantendo-a baixa e não cultivando o solo durante os meses frios.
- Plante nas encostas voltadas para o norte para ajudar as árvores a florescer mais tarde. A melhor maneira de reduzir os danos do frio é manter as árvores saudáveis. Use práticas culturais que induzam e mantenham a dormência no inverno. Esses métodos não incluem fertilização ou poda no final do verão ou outono. Árvores vigorosas podem se recuperar de feridas pelo frio. Árvores fracas que mostram doenças, dano de inseto, ou as deficiências nutricionais são as mais severamente danificadas e as de recuperação mais lenta. Grama, ervas daninhas, e cobertura de palha evita que o calor entre no solo durante o dia, portanto, menos energia é armazenada para liberação à noite. Mantenha o solo ao redor da árvore limpo e livre de cobertura morta, ervas daninhas e cobertura do solo quanto possível. Evite plantar uma safra de cobertura no pomar, ou siga as orientações na seção ‘Culturas de cobertura’.
Preparação do solo, alteração / fertilização
Prepare o solo completamente arando, lavrar ou espar antes de plantar. Remova todas as ervas daninhas. Incorpore cal e matéria orgânica, como estrume bem podre ou composto, nos 20-25 cm superiores do solo antes de plantar. Aplique cal se o solo estiver abaixo de pH 7, a uma taxa de 4,5 kg de cal por 9 metros quadrados. Prepare o solo antes que as árvores cheguem do viveiro, se possível. O damasco geralmente não desenvolve muitas deficiências de nutrientes. O nível de fertilidade do N tem mais influência no crescimento, produção, e qualidade dos damascos do que qualquer outro nutriente de planta individual. Suprimentos adequados de N são necessários para otimizar o crescimento e o desenvolvimento das árvores recém-plantadas.
Fertilização pré-plantio
Composto, estrume animal e estrume verde podem ser trabalhados no solo a uma profundidade de 1 m, Contudo, isso não deve ser adicionado diretamente à cova de plantio de árvores no momento do plantio, mas antes do plantio para que o apodrecimento possa ocorrer e ser concluído antes do plantio, caso contrário, a podridão da raiz é provável. Fontes orgânicas de N, como a uréia deveria ser. Aplicado durante o inverno e / ou primavera, para permitir a decomposição oportuna e liberação de nutrientes. Se o nitrogênio for aplicado, deve ser aplicado à taxa de 20-55 kg por hectare de nitrogênio real.
Eliminando ervas daninhas
Muitas ervas daninhas competem fortemente com as novas árvores de damasco e devem ser eliminadas antes do plantio das árvores.
Projeto de plantio
Os damascos são plantados em blocos sólidos, se forem frutíferos, em espaçamentos de até 4 a 7 metros entre árvores e fileiras. Se a polinização cruzada for necessária, os polinizadores podem estar em números iguais às variedades que polinizam, se o polinizador produz frutos desejáveis. Se o fruto do polinizador for de má qualidade, plante 1 polinizador para cada 9 árvores de cultivo principais, espaçar os polinizadores uniformemente no pomar. O design mais eficaz com polinizadores é um quadrado de árvore 3 x 3, com 9 árvores e a árvore central é um polinizador. Espaçamentos mais próximos podem resultar em árvores menores, ou se as árvores se tornarem muito grandes, elas farão sombra umas às outras e a produção de frutos será reduzida. Árvores de damasco bem irrigadas e bem fertilizadas podem crescer até 9 metros de altura, mas se for permitido crescer vigorosamente até este tamanho, poucos frutos serão produzidos. As árvores de damasco desenvolverão um galho de pelo menos 5 metros de diâmetro na maturidade. Plante-os longe o suficiente para evitar competição excessiva. Orientar as fileiras de árvores de norte a sul melhorará a exposição à luz dos frutos.
Moldando suas árvores jovens
Controle o tamanho podando em aproximadamente 5 metros ou menos, de modo que as árvores apenas "preencham" o espaço disponível no pomar entre as árvores e as fileiras quando as árvores começam a produzir. Os damascos devem ser treinados como "em forma de vaso" ou "com o centro aberto" para obter luz suficiente em todas as partes do dossel para que os botões das flores se formem e frutos de melhor qualidade sejam produzidos. Geralmente, todo crescimento novo e madeira interferente são removidos a cada ano, uma vez que as árvores estão em tamanho real. As árvores têm recursos limitados para crescimento e reprodução; se todos os recursos forem usados para o crescimento vegetativo para obter grandes árvores, nenhum recurso estará disponível para produzir frutos. Árvores grandes não produzem mais frutos.
Estabelecimento de pomar
Viveiro de árvores e plantio
Quando as árvores frutíferas chegam do viveiro, abra os feixes imediatamente para inspecionar quanto a danos e verificar o estado geral das árvores. Certifique-se de que as raízes não sequem; a maioria das árvores frutíferas será "raiz nua", isto é, sem terra ao redor das raízes quando saem do viveiro. “Dê um salto” nas árvores se não estiver pronto para plantá-las. “Adernar” significa cavar uma trincheira rasa na qual as raízes das árvores ou um feixe de árvores podem ser cobertos com solo úmido para protegê-los até o plantio. Plante quando o solo não estiver congelado, mas antes que as árvores comecem a "folhar" no inverno, para permitir o desenvolvimento da raiz antes do crescimento na primavera. Durante os primeiros dois ou três anos, o objetivo é desenvolver uma árvore robusta e de bom tamanho. Pouco ou nenhum treinamento é dado a damascos, além de cobri-los no plantio para garantir o desenvolvimento de cabeças baixas. É aconselhável deixar a árvore crescer seus galhos a uma altura mínima de 2 / 3-1 m para evitar que os frutos toquem no solo quando estiverem em galhos baixos.
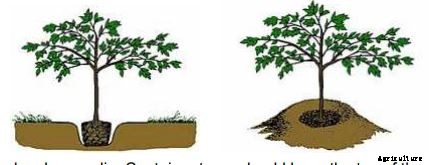
Prepare a cova de plantio
Cave um buraco tão grande quanto necessário para acomodar o sistema radicular. As árvores devem ser plantadas com suas raízes principais, mesmo com a linha do solo. Podar todas as raízes danificadas de volta para além da área danificada. Se as árvores cultivadas em contêineres têm uma raiz de torneira enrolada no fundo de um contêiner, corte essa raiz no ponto onde ela começa a enrolar. Separe e apare as raízes das árvores de contêiner que podem ser limitadas por raiz. Se as árvores são de raiz nua, corte todas as raízes quebradas ou torcidas. Salve o solo do buraco para usar como preenchimento. Se o buraco for mais profundo do que a medição, antes de colocar a árvore no buraco, aterre com solo suficiente para manter a árvore ligeiramente mais alta do que a medida. Pressione firmemente o solo antes de colocar a árvore nele. Certifique-se de que a raiz ou o solo do contêiner repousam sobre um solo sólido para evitar sedimentação. Não adicione qualquer outro corretivo de solo ao buraco, como fertilizante ou composto.
Posicione a árvore
Remova cuidadosamente a árvore do contêiner, apoiando a raiz. Coloque a árvore no buraco na mesma profundidade em que estava crescendo anteriormente. Se os buracos forem cavados muito profundamente, e solo solto é colocado no fundo, as árvores podem se acomodar após a rega. Árvores inseridas muito profundamente podem morrer. As árvores de contêiner devem ter o topo da esfera do solo nivelado com o topo do buraco. Árvores com raízes nuas devem ter solo colocado embaixo delas de maneira a permitir a propagação das raízes em uma posição natural, sem dobras ou dobras. Corte todas as raízes circulares ou torcidas e corte as partes externas da raiz se ela estiver compactada. As raízes soltas devem ser posicionadas voltadas para baixo no buraco. A união do enxerto não deve ser inferior a 5 a 10 cm acima da superfície do solo quando as raízes estão completamente cobertas com solo.
Encha o buraco
Remova todas as pedras, grama ou detritos do solo desenterrado. Quebre torrões. Preencher novamente com a mesma terra que foi removida do buraco. Nunca volte a encher com uma mistura de solo corrigida de uma textura mais leve. Tal prática criará problemas de drenagem e fará com que as raízes das árvores sufoquem durante os períodos de umidade excessiva. Firme o solo ao redor das raízes inferiores com as mãos. Continue enchendo e firmando vários centímetros de cada vez. O solo deve ser firme, mas não com força, embalado. Retire todas as ervas daninhas ao redor do buraco de plantio. Antes da conclusão do enchimento, adicione água para assentar o solo e eliminar bolsas de ar ao redor das raízes. Depois de regar, preencher o buraco até a conclusão e, se necessário, construir uma bacia (cristas de solo ao redor de toda a circunferência da árvore) para reter a água durante as irrigações subsequentes. Com irrigação por gotejamento, esta prática pode não ser necessária. As bacias não são necessárias durante chuvas excessivas ou se a irrigação por inundação puder ser usada em intervalos regulares após o plantio.
Depois que a árvore é plantada, poço de água. Verifique a linha de solo original uma última vez. Se a árvore se estabelecer, agora é a hora de movê-lo de volta para a posição correta com o nível do solo contra o tronco no mesmo nível que estava no recipiente. Como uma regra geral, depois que o solo se assentou, a grande raiz superior deve estar logo abaixo da superfície do solo. Construa uma bacia para regar a árvore recém-plantada, certificando-se de que a água escoa para fora do tronco. A bacia deve ser um pouco mais larga do que o buraco de plantio para que a água possa ser aplicada em toda a área da raiz e um pouco mais além. A maior parte do volume da raiz ocupa uma área bastante limitada, particularmente durante a primeira estação de cultivo, portanto, pode ser necessário regar com frequência até que as raízes se estabeleçam. Encha a bacia uma ou duas vezes por semana em clima quente, menos frequentemente quando está frio ou chuvoso. A água deve penetrar nas raízes das árvores cultivadas em recipientes ou de raízes nuas, uma vez que elas não podem obter água do solo ao redor até que suas raízes cresçam nele. Nivele a bacia no inverno para que a árvore não fique na água da chuva acumulada. O solo a cerca de 1 m do tronco da árvore deve ser mantido livre de grama, ervas daninhas, ou outra vegetação que pode competir com a árvore por água e nutrientes. Uma camada de cobertura morta com 7,5 a 15 cm de espessura, como aparas de madeira ou aparas de grama ajuda a controlar ervas daninhas e conservar a umidade. A cobertura morta deve ser mantida a vários cm de distância do tronco para minimizar a ocorrência de podridão da copa e eliminar esconderijos de insetos-praga.
Aposta se necessário
A menos que a árvore se incline, não precisará de suporte de estaqueamento. Se houver necessidade de apostas, coloque-os em lados opostos da árvore, perpendicular à direção do vento predominante. As estacas devem ser posicionadas fora da área da raiz, mas não além do que os laços da árvore podem alcançar. Fixe as estacas no solo de forma que o topo delas fique alguns centímetros abaixo do galho principal mais baixo. Coloque amarras cerca de 15 cm acima do local onde a árvore se dobra, que terá cerca de 2/3 a ½ do caminho até a árvore. A fim de evitar que os dormentes esfreguem a casca da árvore, use laços de borracha cortados de pneus automotivos entre os dormentes e a árvore. Faça laços ao redor da árvore e prenda um em cada estaca. As gravatas devem ser soltas, para que a árvore possa oscilar, e o tronco pode ficar mais forte.
Proteção contra queimaduras solares no plantio
A casca das árvores recém-plantadas é facilmente danificada por muito sol; quando ferido, a casca é facilmente infestada por insetos brocas. Proteja a casca da árvore das queimaduras solares imediatamente após o plantio, pintando com tinta látex de interior branca diluída até a metade com água. Apply the paint mixture from the soil surface up the entire trunk, including the dormant buds. Pruning newly-planted trees.
General rules for pruning apricot trees.
- Prune trees at planting time to balance the tops with the roots.
- Prune young trees very lightly.
- Prune mature trees more heavily, especially if they’ve shown little growth. Tree canopy should be kept open with considerable thinning-out in order to induce annual formation of fruit-bearing wood. Apricot fruit is borne on short spurs that are short lived.
- Prune when all danger from fall or early winter freeze has passed, but before full bloom in spring. This reduces the risk of disease and injury , Contudo, apricots bloom very early; consequentemente, all or most of the flowers or young fruits are frequently killed by frost. Delaying pruning until after bloom may be advisable with apricots grown in an area that gets late frost frequently.
- Prune less heavily if there is a light or no crop at all.
- Prune the top portion of the tree more heavily than the lower portion as the top is where most vegetative growth occurs.
- Thin out more shoots toward the end of a well-pruned branch in a mature tree. This will increase fruit size and quality on the remaining shoots.Pruning too early in the dormant season can lead to the following problems:
- Increased incidence of Cytospora canker, which enters the tree through pruning wounds. Pruning close to bud break when the tree starts active growth leads to rapid healing of pruning wounds.
- increased internal damage.
- increased sunscald of the bark.
Ervas daninhas
Weed by hand frequently or with a hoe, working shallowly to prevent damage to roots.
Fertilizing a young and growing orchard
Maintaining a good fertilization program can keep trees vigorous and help prevent infections of bacterial blast or canker, oak root fungus, e oídio. Mineral nutrients are classified as macronutrients and micronutrients. The term ‘’macronutrients” refers to those elements that plants require in large amounts (N, P, K, Ca, Mg, S). The term “micronutrients” (or “trace elements”) applies to plant nutrients that are essential to plants but are needed only in small amounts [Fe, Zn, Mn, B, Cu, Mo, Ni (nickel), Cl (chlorine)]. Visual deficiency symptoms of N, P, K, Ca, Mg, Fe, Zn, Mn, B, Cu, and Mo (nitrogen, fósforo, potássio, cálcio, magnésio, ferro, zinco, manganês, boro, copper and molybdenum) can usually be recognized by distinctive symptoms that most often occur in the leaves, but can sometimes be seen in the fruit, galhos, or general growth of the tree. The most common deficiency symptoms found in apricot are nitrogen and zinc.
Types of fertilizer to use:Generally, only two types of commercial fertilizers are required:a balanced fertilizer (8-8-8, 13-13-13), and a nitrogen fertilizer such as ammonium nitrate (33-0-0), or ammonium sulfate (21-0-0). Urea (46-0-0) is a good source of nitrogen. The balanced or complete fertilizer contains nitrogen, fósforo, e potássio, the elements needed in the largest amounts by apricot trees. The nitrogen fertilizer stimulates vegetative growth later in the year. The numbers 8-8-8 or 13-13-13 represent the percentage of nitrogen-phosphorus-potassium the fertilizer has. DAP is diammonium phosphate (18-46-0). If soil pH is above 6.5, use ammonium sulfate (21-0-0) as the nitrogen source as it helps acidify the soil. If soil pH is 6.5 or below, use another source of nitrogen. If soil pH is above 7.5, do not apply phosphorus fertilizer. Do not ever apply sulfur directly to apricot trees.
Scatter fertilizer under the spread of branches and just beyond the dripline of the outermost branches. To prevent fertilizer burn, do not apply fertilizer closer to the trunk than 20 cm. You may apply fertilizer any time from late fall to early spring. Water thoroughly to carry the nitrogen down into the root zone. Remove competition for nutrients and water by keeping the ground bare under the tree using shallow cultivation, herbicidas, or organic mulches.
Don’t apply excessive amounts of fertilizer. Too much nitrogen causes excessive branch growth, inhibits fruit set, causes poor fruit color and flavor, delays ripening and may subject the tree to more severe winter injury. Também, late application of nitrogen, after mid July, can prevent the proper “hardening off” of the tree for winter dormancy.
Fertilizing apricot trees that are 3 years and older
Azoto
Nitrogen should be applied annually, usually during the growing season. To improvefruit quality and color, nitrogen levels should be low but not deficient as the harvest nears. Excessive nitrogen can cause softer fruit, poor fruit color, and reduced storage and shelf life; it can also increase problems with numerous pests. Apply well away from the trunk and water thoroughly after application. Apply half to two-thirds of the fertilizer in autumn and the rest in spring. Rates for different nitrogen sources per tree per year year (use only 1 of these):1.4 to 2.3 kg of ammonium sulfate, 1 kg of urea, 2 to 3 kg ammonium nitrate, Well-rotted animal manure (e.g. poultry manure 20 to 30 kg per tree)
Potássio
3 year-old tree:Apply a fertilizer containing potassium, such as muriate of potash (1 to 2 kg per tree) or a mixed N:P:K fertilizer (4 to 8 kg per tree depending on the potassium (K) content). 4th year and older:Halve these rates.
Fósforo
Dig in 10 kg of superphosphate (20 kg for trees six years and older) around the tree. Do not repeat this. OR:Use three to five leaf sprays of 0.5% (5 g per liter) of monosodium phosphate, plus a wetting agent.
Magnesium
If trees show symptoms of Magnesium deficiency, do not apply any potassium fertilizer. Increase the amount of nitrogen fertilizer. Apply magnesium carbonate or a lime containing magnesium to tree. Spray leaves two or three times with 1% (10g per litre) magnesium nitrate or 2% magnesium sulphate plus a wetting agent.
Manganês
Apply two or three foliar sprays containing 0.25% (2.5 g per litre) of manganese sulphate, plus a wetting agent.
Zinco
Spray with a “chelated zinc” during the growing season. Repeat if new growth still shows deficiency symptoms. Soil applications are not very effective because the roots of fruit crops occupy deep soil layers and zinc does not easily move in the soil. Although foliar sprays are more effective, foliar-absorbed Zn is not easily translocated in plants, which necessitates repeated spray applications and diminishes the ability of foliar sprays to alleviate Zn deficiency in all plant parts.
Recognizing nutrient deficiencies

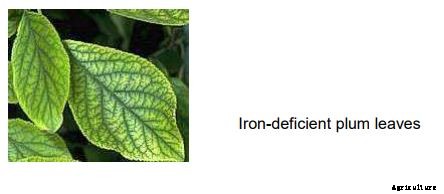
If nitrogen is deficient, older lower leaves of fruit trees may become yellow, terminal shoot growth is reduced, and fruit yields decline since the tree may not set or carry much fruit. If nitrogen is excessive, vegetative growth may be lush, but fruit set may be reduced and fruit maturity delayed by 7 to 10 days. Portanto, either an excess or deficiency of nitrogen should be avoided. Yellow leaves of new growth usually indicate iron or zinc deficiency, and in severe cases the entire tree may be yellow. Leaves are small, estreito, closely spaced and mottled with yellow, especially new leaves. Lateral leaf buds may fail to grow. Affected trees have small new leaves. Iron deficiency appears as yellowing between major veins of the leaf. Other deficiencies are uncommon.
Irrigação
Regular irrigation is needed to grow tree fruit. Uniform soil moisture is important in maintaining tree vigor, produtividade, e tamanho da fruta. It is especially important to provide the tree with adequate water during the first year after planting to help develop a good root system. Irrigate from the onset of growth in the spring through the growing season after harvest. Avoid frequent shallow irrigation. Freqüente, light watering encourages a shallow root system and can cause the development of wood rot which attacks the trunks and roots, killing the tree. Less frequent and deeper watering is preferable. Irrigate your trees with a deep soaking every 7 to 15 days, depending on the season and weather. It may be helpful to make a depression or basin around trees to collect water and aid in summer irrigation. Contudo, excessive irrigation or excessive precipitation can create a problem with rot around the trunk collar. It is also important to level the soil surrounding the tree in the fall. This prevents water from collecting and freezing around the trunk during the winter and causing injury to the tree. Surface irrigation by furrows and flooding (Gravity flow):Furrows should be filled with water and then drained, to ensure that the entire root system receives a sufficient amount of water. Border berms can be used to contain the water for a 1 to 2 day period for adequate absorption. Berms should then be removed until the next watering. Soil-based Scheduling Methods (How to know when to water):Irrigation should bedone when about 50% of the water has been depleted from the soil. To check the water content in the soil, take a trowel, shovel, or soil tube and dig down 20 to 40 cm. A soil that has about 50% available water will feel as follows:
Textura do solo
coarse – appears almost dry, will form a ball that does not hold shape; loamy – forms a ball, somewhat moldable, will form a weak ribbon when squeezed between fingers, dark color; clayey – forms a good ball, makes a ribbon an inch or so long, dark color, slightly sticky. Mulches are beneficial to young fruit trees. Mulches of any plant material, such as shredded bark, grama cortada, Palha, or sawdust conserve soil moisture, moderate extreme soil temperatures, and help reduce competition from weeds and turf. Apply a mulch 10 to 15 cm deep, but keep the mulch several inches away from the trunk. In early fall, remova a cobertura morta. This lets the roots know that temperatures are getting cooler and winter is on its way. The tree will begin to harden off or get physiologically ready for winter. Removing the mulch also prevents mice and other rodents from hiding in the mulch and chewing off the bark during the winter.
Fruit thinning
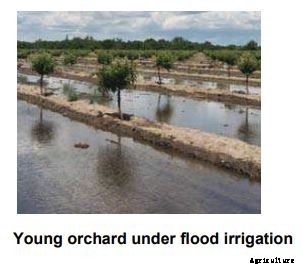
When all factors are favorable trees can set too many fruit. An overabundance of fruit on a tree may weaken it and result in fewer buds, leading to a smaller crop for the next season. A heavy crop also can result in small-sized fruit of poor quality. To avoid these problems, thin trees two to three weeks after bloom. Remove all but the largest fruit in each cluster. Remove small, insect- or disease-injured fruit first and follow recommended average spacing distances. Fruit should be spaced by 7 to 10 cm apart Young orchard under flood irrigation Flood irrigation contained by border berms on each branch, with small branches having only 1 or 2 fruit. Thinning should be done to allow a closer spacing near the base of the branch and a wider spacing near the tip of the branch. This is done to avoid the branch bending or breaking off from too much weight at the tip.
Major diseases and insects and their control
Podridão parda
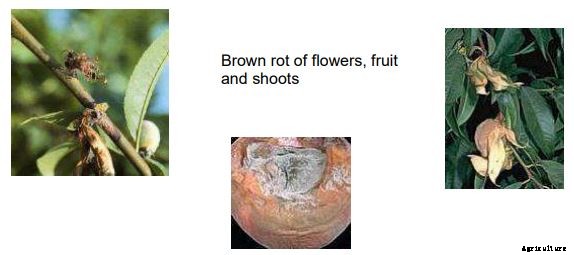
Brown rot is a major disease that can infect the blossoms, fruta, spurs (flower and fruit bearing twigs), e pequenos ramos. Rain during the pre-bloom and bloom period can lead to flower infection and crop loss. Warm and humid weather conditions can lead to fruit infections causing entire crop loss on the tree or in storage. Disease prevention is essential, especially just before ripening, during, and after harvest of fruit. Typical disease symptoms are blossom and twig blight, cancros, and fruit rot.
Blossoms:
Blossom infections reduce fruit set and cause fruit infections later in the season. Infected flowers turn brown, murchar, e morrer. Em alguns casos, they may become fixed to twigs as a gummy mass, in others, they may drop. Susceptibility to blossom blight is variable among the stone fruit with apricot being the most susceptible, followed by prune, sweet cherry, pêssego, sour cherry, e ameixa, respectivamente. Controlling blossom infections is essential to managing the development of the disease in the orchard.
Frutas:
Brown rot infections on fruit first appear as soft brown spots which rapidly expand and are covered with powdery masses of tan colored spores. Infected fruits rot very rapidly, and shrink into a wrinkled “mummy” as it dries on the tree. Both immature and mature fruit infected with brown rot tend to remain on the tree.
Gestão:
Applications of copper-containing fungicides at pink bud stage can help avoid serious losses. Do not apply copper compounds after bloom; after bloom use noncopper-containing fungicides. Prompt removal and destruction of fruit mummies (dried Brown rot of flowers, fruit and shoots diseased fruit) and diseased plant parts prevents the buildup of brown rot inoculum and helps keep rot below damaging levels. Prune trees to allow good ventilation. Avoid wetting blossoms, folhagem, e frutas.
Botrytis blight or gray mold
Botrytis blight or gray mold is a fungus disease which can cause blight. Botrytis infections are favored by cool, rainy spring and summer weather usually around 15 ºC. Gray mold can be particularly damaging when rainy, drizzly weather continues over several days. Botrytis blight can affect leaves, caules, flores, fruta, and any other part of a plant with the exception of the roots. Treat as for Brown rot.
Canker bacteriano
Bacterial Canker is a disease that causes cankers (irregularly shaped, marrom, watersoaked areas) that develop in the bark and outer sapwood of spurs, galhos, and the tree trunk. Small cankers can develop on twigs at the base of infected buds. Na primavera, amber-colored gum may ooze from the margins of cankers. In cold, clima úmido, blossoms may turn brown, murchar, and cling to the tree. Leaves also may develop dark spots that later drop out. Sunken spots may develop on young fruit.
Gestão:
Avoid planting on shallow soils. Delay pruning until late winter. Cauterize pruned branches with a hand-held propane burner where disease is known to exist. If trees have been infected, remove entire affected branches in the summer, being sure to eliminate the entire canker and a few inches below. Choice of rootstock and varieties can influence susceptibility to bacterial canker and blast. Fall or spring foliar applications of complete micronutrients (especially zinc and boron) may help prevent bacterial canker, as nutrient deficiencies make all stone fruits more susceptible. Trees stressed by nematodes are more likely to be severely damaged.
Phytophthora root and crown rot
Infected trees or plants often wilt and die rapidly with the first warm weather of the season. Leaves may turn dull green, amarelo, or in some cases red or purplish. Symptoms may develop first on one branch or stem then spread to the rest of the tree or plant. Darkened areas develop in the bark around the crown and upper roots. Gum or dark sap may ooze from the margins of the diseased trunk area. Reddish brown streaks or zones can be seen in the inner bark and outer layer of wood.
Gestão:
The key factor in reducing the threat of root and crown rot is good water management. Good soil drainage is best provided before planting. Never cover the graft union with soil and do not water the crown area directly. If you suspect crown rot, carefully cut away affected bark at the soil line. Trees can sometimes be saved by removing soil from the base of the tree down to the tops of the main roots and allowing the crown tissue to dry out.
Rhizopus Rot
Rhizopus Rot is caused by Rhizopus stolonifer– occurs frequently in ripe or near-ripe apricot fruits held at 20 to 25°C.
Gestão
Cooling the fruit and keeping them below 5°C is v ery effective against this fungus.
Eutypa dieback
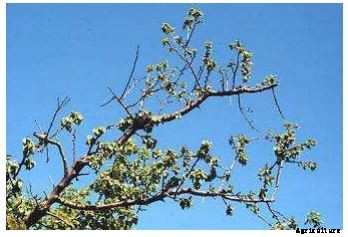
Eutypa dieback of apricot appears more frequently in mature orchards. The first symptom is usually the rapid collapse of a branch during mid-summer. Leaves suddenly wilt and die, remaining attached to the branch. Examination of the base of the dead branch will reveal a canker surrounding a pruning wound. Most cankers produce large amounts of gum.The fungus spreads toward the trunk, eventually killing the tree. Eutypa has not been officially reported for apricot, Contudo, it may appear on apricot as well as other stone fruit species and grapes.
Gestão:
Prune late in the dormant season to promote rapid healing of wounds.Remove and burn infected wood inside the orchard and dead wood in adjacent orchards to reduce the spread of the pathogen. Cut out and remove dead limbs and trees from the orchard during dormancy. Completely remove all cankers, pruning below the canker on the limbe or trunks until no darkened canker tissue remains. Make large cuts directly after a rain because the risk for infection is lowest at this time as the atmospheric spore load has been washed out temporarily.
Pulgões
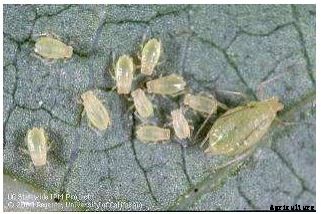
Small numbers of aphids are not a concern. Contudo, large populations cause curling, amarelecimento, and distortion of leaves and stunting of shoots; they can also produce large quantities of a sticky exudate known as honeydew, which often turns black with the growth of a sooty mold fungus that can damage fruit.
Gestão:
Catch infestations early. Once aphid numbers are high and they have begun to distort and curl leaves, it is often hard to control them because the curled leaves shelter aphids from insecticides or natural enemies. Where aphid populations are localized on a few curled leaves or new shoots, the best control may be to prune these areas out and dispose of them. In large trees, some aphids thrive in the dense inner canopy; pruning these areas out can make the habitat less suitable. Keep the area free from weeds that can harbor aphids. High levels of nitrogen fertilizer favor aphid reproduction. Never use more nitrogen than necessary. Insecticidal soap, óleo de nim, and narrow-range oil (e.g., supreme or superior parafinic-type oil) provide temporary control if applied to thoroughly cover infested foliage. To get thorough coverage, spray these materials with a high volume of water and target the underside of leaves as well as the top. Soaps, óleo de nim, and narrow range oil only kill aphids present on the day they are sprayed, so applications may need to be repeated.
Broca de galho de pêssego
Larvae bore into the growing shoots of twigs and ripening fruit or nuts. Shoots and leaves wilt and die back one to several inches from the growing tips of twigs. In fleshy fruit, injury is usually superficial. Tolerate low levels of damage.
Gestão
The most reliable control for peach twig borer is a dormant spray of spinosad or spinosad and oil, applied in winter to kill overwintering caterpillars on the tree branches. Spinosad or Bacillus thuringiensis, applied just as trees bloom and again a week later, also controls the pest. Avoid spraying during the growing season because it is difficult to time pesticide applications effectively. Sprays must be applied to control hatching larvae before they enter twigs or fruit.
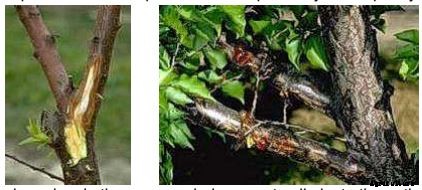
Peachtree borer
Peachtree borer and damage near the soil line from the borer. The adult peachtree borer is a steel blue to black clearwinged moth. Larvae are light brown or pinkish with a darker head. Damage is found primarily in the crown area or lower part of the trunk above or just below the soil line. These pests can girdle and kill a healthy young tree. Older trees are sometimes attacked but they usually tolerate the damage unless there are many larvae or a tree is attacked several years in a row. Management:Keep trees healthy and vigorous. You can remove borers through a technique called worming during fall, inverno, ou início da primavera. Treatment of trunks with insecticides or parasitic nematodes can be effective.
Cochonilhas
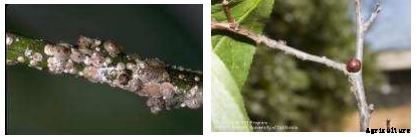
When plants are heavily infested with scales, leaves may look wilted, ficar amarelo, and drop prematurely. Scales sometimes curl leaves or cause deformed blemishes or discolored halos in fruit, sai, or twigs. Bark infested with armored scales may crack and exude gum. When numerous, some scale species weaken plants and cause them to grow slowly. Branches or other plant parts may die if they remain heavily infested with scales. If plant parts die quickly, dead brownish leaves may remain on branches, giving them a scorched appearance. Several years of severe infestations may kill young plants.
Gestão:
If scales become too numerous, a well-timed and thorough spray using horticultural (narrow-range) oil applied either during the dormant season or soon after scale crawlers are active in late winter to early summer should provide good control. Complete spray coverage of infested plants (such as the underside of leaves) is needed to obtain good control. Thorough spray coverage is especially critical when treating armored scales and oak pit scales, as these scales are generally less susceptible to pesticides than soft scales. Harvest and postharvest handling
Maturidade
Apricots for fresh consumption are picked firm-mature; firmness is a reliable indicator, as is color development.
Harvest method
Apricots for fresh consumption or processing are picked by hand and carefully handled. Trees are usually picked over 2-3 times each, when fruit are firm.
Fruit for processing
Dried apricots can be harvested later (fully ripe) than those for fresh market, and exposed to SO2 (sulfur dioxide) to avoid post-harvest diseases. Sun-drying is the common method of drying apricots in Afghanistan. Canned apricots are immersed in sugar syrup. Fruit can also be made into jam or chutney.
Armazenar
Apricots when fresh have an extremely short shelf-life of only 1- 2 weeks at 0° C and 90% relative humidity. They are susceptible to all post-harvest diseases (e.g., Rhizopus fruit rot). Fruit can be canned either as whole, unpitted, whole and pitted, cut fruit or juice. geléia, geléia, creme, marmalade, green apricot pickles and dried fruit pulp, apricot cake.